The correct IP address is sometimes all you need to exploit a remote target.
Background
I realise this article will not help me with my colleagues who believe I just happen to get lucky on every assessment IвАЩm on. Nevertheless, during a recent internal pentest, our first objective was to attempt to bypass the Network Access Control (NAC) mechanism. This was not a standard 802.1x system, but some technology that would allow access to the network for foreign machines as long as nothing malicious was being performed (or something along these lines). Essentially, once a specific malicious threshold was reached, network connectivity is blocked.
So I started my assessment slowly, gradually increasing the attacks and ended up compromising multiple systems without ever being blocked by the NAC. Obviously, the client was a bit surprised by this, especially given the fact that some of the later attacks hadnвАЩt been particularly stealthy.
After searching for a reason for this, we discovered that the DHCP server had given me an IP address which had previously been leased to a legitimate corporate workstation. At the time, the NAC had then been able to determine that the IP belonged to a genuine registered workstation and thus disabled all of the NAC controls for that IP. There is obviously a timeout to these checks, but all of my attacks had been performed within a relatively short time window and had therefore gone completely unnoticed.
What I hadnвАЩt noticed immediately at the time was that not only had my IP been whitelisted, but I had also inherited the hostname of the legitimate workstation in the corporate DNS. This got me wondering whether I could take advantage of this kind of situation more commonly than to bypass this specific NAC system, which leads us to Resource-Based Constrained Delegation (RBCD) and Shadow Credentials attacks.
Computer takeover
Resource-Based Constrained Delegation
If you have performed an internal penetration test in the last 4 years or so, you have more than certainly exploited Resource-Based Constrained Delegation to gain access to a remote Windows machine. Since the blog posts written by Elad Shamir and Will Shroeder, it has become common practice to exploit these issues since most Windows/Active Directory setups will be vulnerable by default.
If you are unfamiliar with the attack, I strongly suggest you read the two blog posts above, but to summarize the idea behind the attack, the objective is to relay an NTLM authentication request coming to the attackerвАЩs machine from a targeted domain computer to the LDAP or LDAPS service on a domain controller. This allows to modify the computer accountвАЩs settings (specifically the msdDS-AllowedToActOnBehalfOfOtherIdentity attribute) to add resource-based constrained delegation for an account under control of the attacker.
Shadow Credentials
The RBCD takeover primitive is powerful but it has the requirement of having a previously compromised account which has a Service Principal Name (SPN) to work. Slightly more recently, the so-called Shadow Credentials primitive has therefore been more popular. A detailed blog post can be found here.
In this case, the idea is to generate a public-private key pair and then add it to the targeted account’s msDS-KeyCredentialLink attribute and then use it for authentication. For this to be of any use, it must then be possible to authenticate with a private key in the target environment.
Authentication Coercion
Both of the attacks described above can be exploited after relaying a computer account authentication to a domain controller’s LDAP service. For this to work, LDAP signing or Channel binding need to be disabled on the domain controller, otherwise the relaying will not be possible. On the other side, it must be possible to trigger an authentication request to our attackerвАЩs machine which can typically be done with the Printer Bug, PetitPotam or other coercing techniques. However, not every protocol can be relayed to the LDAP service due to specific client signing requirements and typically only an HTTP request will be able to be relayed successfully.
In certain cases it is possible to coerce a machine to perform an HTTP request to a WebDav resource. This requires the WebClient service to be running on the host. Now there is one final caveat which is the fact that authentication will only be attempted if the target URL is considered as a local intranet site.
There are essentially 3 different types of URLs for which credentials will be sent:
- URLs that are part of a special
AuthForwardServerListregistry key which I have yet to see in use anywhere. - A proxy is configured, and the URL is configured to bypass the proxy.
- There is no dot вАЬ
.вАЭ In the server name of the URL.
This is where ADIDNS generally comes into play.
Active Directory Integrated DNS
Active Directory Integrated DNS (ADIDNS) is a way of storing DNS information within the Active Directory. I wonвАЩt delve into the details of how this functions here, but there are several other blog posts explaining how it works and how it can be abused.
Typically, computers will update the DNS entry concerning their hostname by providing their IP address to the Domain Controller when connecting to the network. However, by default, all Authenticated Users have the permission to create child entries, which is what is exploited in the 3rd scenario described above. This can also be exploited to add a wildcard entry, but again this has already been covered and tends to have somewhat unexpected side-effects during assessments and so I tend to avoid touching it.
When I inherited the hostname of a previously connected workstation, I had inadvertently exploited a stale ADIDNS entry. It turns out that by default there is no decay for these entries, and they will remain configured until a computer updates them again. This means that if we can identify an IP address on our VLAN which was previously used by a legitimate workstation that is no longer connected to the network, we can steal that IP and therefore use the associated hostname without having to modify any DNS entries.
If you’re super lucky, certain other hosts may still be trying to communicate with the disconnected endpoints and you may not even need to do any kind of coercing.
Attack
Knowing all of this, the attack is relatively straightforward to put together:
- Retrieve all DNS entries from ADIDNS.
- Determine which ones are located on the current subnet.
- Determine whether anything currently responds to that IP on the subnet.
- Statically configure your network interface with that IP.
You can now exploit your classic RBCD attack with this undotted hostname without ever modifying any DNS entry, which also means itвАЩs much stealthier.
For the first step, the adidnsdump tool written by Dirk-jan works very well.
The second step is even easier, as we just have to check the IP address of each DNS entry and verify whether it is on the current subnet.
For the third step, one might attempt to just ping the IP address, but many host firewalls will block ping requests, so going down one layer will give more accurate results. Using a simple ARPing request should be able to determine whether anybody on the subnet responds to the IP in question.
From there it is just a matter of assigning the IP to your network interface, and voilà!
During a more recent engagement, I ended up in a case where I didn’t actually have an initial account to perform the ADIDNS lookup and I realised that it wasn’t necessary for this attack, as it is entirely possible to do it with simple reverse DNS lookups on all IP addresses in the current subnet. It has the drawback of being a little slower, but it works without an account which is always nice.
Tooling
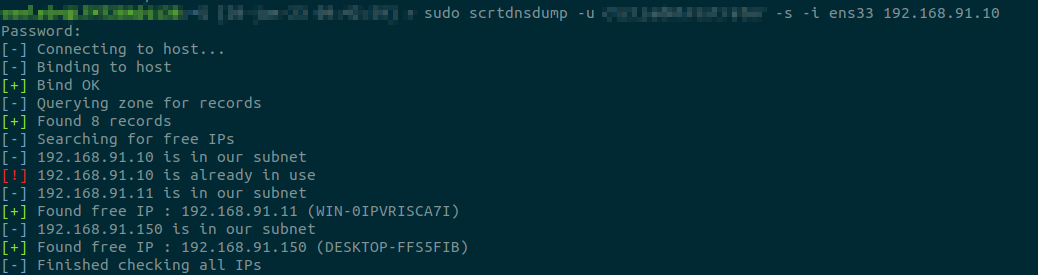
Rather than re-inventing or re-writing tools that already exist, I started off by extending Dirk-janвАЩs adidnsdump tool to add the possibility of testing each discovered DNS entry to first check whether it is on the current subnet, and then check whether it is free or not. You can find a fork of the initial tool with the added functionality here:
There are two additional command line switches :
-
-ito specify the interface to match IPs with -
-sto then run the arping and suggest IPs to use
And for the cases where we don’t have an initial account, I simply wrote a bash script that iterates over the IP addresses in a specified interface’s subnet searching for any IP which has a PTR DNS entry and for which arping does not return an associated MAC address.
#!/usr/bin/env bash

function get_subnet_ip_addresses() {
    if [ $# -ne 1 ]; then echo "Missing argument"; return 1; fi

    # Get network interface information
    i_info=$(ip -o -f inet addr show $1)
    if [ $? -ne 0 ]; then return 1; fi

    # Suppress redundant spaces
    i_info=$(echo "$i_info" | sed s/' '+/' '/g)
    i_info_arr=(${i_info// / })

    # Extract IP address and broadcast address
    i_name=${i_info_arr[1]}     # eth0
    i_ip_cidr=${i_info_arr[3]}  # 192.168.140.136/24
    i_brd=${i_info_arr[5]}      # 255.255.255.0

    # Extract IP address and CIDR
    i_ip_cidr_arr=(${i_ip_cidr//\// })
    i_ip=${i_ip_cidr_arr[0]}    # 192.168.140.136
    i_cidr=${i_ip_cidr_arr[1]}  # 24

    # Build network mask from CIDR
    if [ $((i_cidr)) -lt 8 ]; then
        mask_arr=($((256-2**(8-i_cidr))) 0 0 0)
    elif [[ $((i_cidr)) -lt 16 ]]; then
        mask_arr=(255 $((256-2**(16-i_cidr))) 0 0)
    elif [[ $((i_cidr)) -lt 24 ]]; then
        mask_arr=(255 255 $((256-2**(24-i_cidr))) 0)
    elif [[ $((i_cidr)) -lt 32 ]]; then
        mask_arr=(255 255 255 $((256-2**(32-i_cidr))))
    elif [[ ${i_cidr} == 32 ]]; then
        mask_arr=(255 255 255 255)
    fi

    # Apply the network mask to the IP address to get the subnet IP adddress
    i_brd_arr=(${i_brd//./ })
    i_ip_arr=(${i_ip//./ })
    net_ip_arr=($(( mask_arr[0] & i_ip_arr[0] )) $(( mask_arr[1] & i_ip_arr[1] )) $(( mask_arr[2] & i_ip_arr[2] )) $(( mask_arr[3] & i_ip_arr[3] )))

    # Loop through all values from subnet address to broadcast address.
    for b1 in $(seq ${net_ip_arr[0]} ${i_brd_arr[0]}); do
        for b2 in $(seq ${net_ip_arr[1]} ${i_brd_arr[1]}); do
            for b3 in $(seq ${net_ip_arr[2]} ${i_brd_arr[2]}); do
                for b4 in $(seq ${net_ip_arr[3]} ${i_brd_arr[3]}); do
                    echo "$b1.$b2.$b3.$b4"
                done
            done
        done
    done
    return 0
}

function test_free_ip() {
    interface=$1
    ip=$2
    printf "[*] Testing : $ip\n"
    arping $ip -c 1 -I $interface -q
    if [ $? -eq 1 ]
    then
        # arping didn't return a result, so we attempt a lookup
        names=$(dig -x $ip +short)
        if [ ${#names} -gt 0 ]
        then
            printf "\033[0;32m[+]\033[0m Found free IP : $ip with following name(s)\n"
            printf "\033[0;32m$names\n\033[0m"
        fi
    fi
}

export -f test_free_ip

if [ $# -ne 1 ]; then echo "Missing argument, please supply network interface"; exit 1; fi
interface=$1
get_subnet_ip_addresses $interface | xargs -P 10 -I {} bash -c "test_free_ip $interface {}"
This should give an output similar to what is shown below:
# ./freeipscanner.sh ens33
[*] Testing : 192.168.91.0
[*] Testing : 192.168.91.1
connect: Permission denied
[*] Testing : 192.168.91.2
[*] Testing : 192.168.91.3
[*] Testing : 192.168.91.4
[*] Testing : 192.168.91.5
[*] Testing : 192.168.91.6
[*] Testing : 192.168.91.7
[*] Testing : 192.168.91.8
[*] Testing : 192.168.91.9
[*] Testing : 192.168.91.10
[*] Testing : 192.168.91.11
[*] Testing : 192.168.91.12
[*] Testing : 192.168.91.13
[*] Testing : 192.168.91.14
[*] Testing : 192.168.91.15
[*] Testing : 192.168.91.16
[+] Found free IP : 192.168.91.10 with following name(s)
clz.pwn.
[*] Testing : 192.168.91.17
[*] Testing : 192.168.91.18
[*] Testing : 192.168.91.19
[*] Testing : 192.168.91.20
[+] Found free IP : 192.168.91.11 with following name(s)
clz-WIN-0IPVRISCA7I-CA.
WIN-0IPVRISCA7I.clz.pwn.
[*] Testing : 192.168.91.21
[*] Testing : 192.168.91.22
You can find the script over here:
Remediation
Microsoft does provide the option to Scavenge stale resource records after a predetermined period of time. Obviously this is not configured by default, but it can be configured. To be honest I’m not sure how effective this would be, as the timeout would probably have to be very short for it to be effective against this type of attack.
Obviously all other recommendations to prevent the RBCD or Shadow Credentials attacks in the first place still apply:
- Require LDAP signing and Channel binding on the domain controllers.
- Do not allow all accounts to add new computer accounts to the domain.
- Restrict the possibility of using RBCD if it is not used in your organisation.
- Protect privileged accounts by marking them as sensitive for delegation.
- Monitor modifications to the
msDS-KeyCredentialLinkandmsdDS-AllowedToActOnBehalfOfOtherIdentityattributes