When I investigated CVE-2022-41099, a BitLocker Drive Encryption bypass through the Windows Recovery Environment (WinRE), the fact that the latter was able to transparently access an encrypted drive without requiring the recovery password struck me. My initial thought was that there had to be a way to reproduce this behavior and obtain the master key from the Recovery Environment (WinRE). The outcome of a generic BitLocker bypass was too tempting not to explore this idea…
How it all started
First and foremost, reading the post CVE-2022-41099 вАУ Analysis of a BitLocker Drive Encryption Bypass first is recommended for a better understanding of the context, but not strictly required. The gist of it is that BitLocker did not relock the volumes when performing certain recovery operations, thus allowing an attacker with physical access to pause the automatic decryption of the disk during a machine reset and extract the keys.
This attack was only possible in a scenario where BitLocker is configured in “TPM-only” mode, which is the default since most PCs come equipped with a Trusted Platform Module (TPM) chip nowadays. Even more so, Microsoft made it non-trivial for users to configure an additional PIN or a startup key since you have to enable and edit (local) group policies to do so.
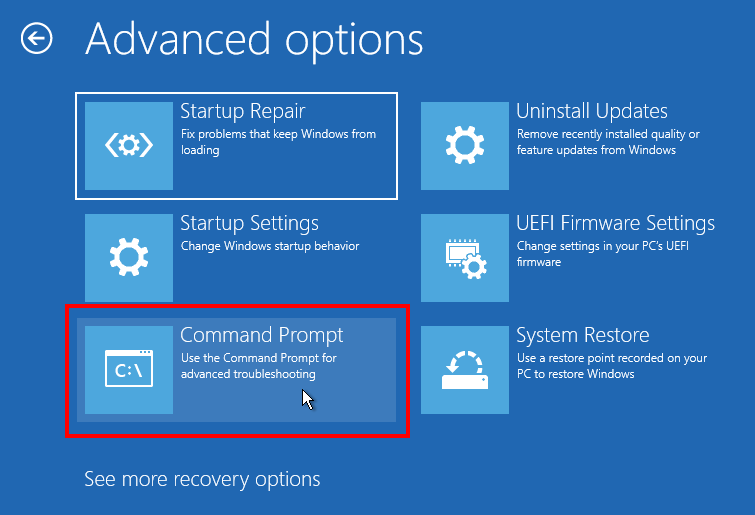
In addition to the System Restore option that was previously exploited, we also have the possibility to open a command prompt.
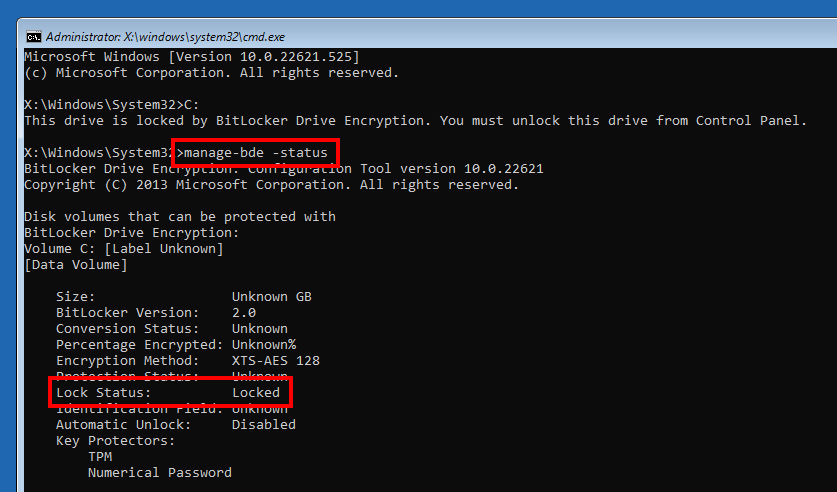
Of course, in this mode, WinRE prompts you to enter the recovery password. This was also true before the patch for CVE-2022-41099. You can choose to skip this step, but then the disk remains locked. And by “locked” I mean that BitLocker discarded the in-memory keys that were automatically obtained at boot time.
I also knew that the ability to obtain the master key using the TPM at boot time was closely tied to the machine’s hardware and firmware configuration, which is why the trust is broken when booting from an external drive for instance. However, when booting into the recovery environment tied to the installed OS, the boot sequence is not altered. So, by reimplementing the steps taken by BitLocker to obtain the master key at boot time, we should be able to unlock the disk, right? Let us find out…
BitLocker keys and the TPM
First of all, there is a common misconception that the BitLocker keys are stored in the TPM. Although data can be pushed to the NVRAM of the TPM, the keys are actually stored encrypted in metadata blocks on the BitLocker-protected drive itself.

A BitLocker volume header starts with a boot entry point consisting of a sequence of 3 fixed bytes, followed by the filesystem signature -FVE-FS-. Further in the header, you will find the BitLocker volume header version 1 (Vista) or 2 (7 and later). This structure contains 3 offsets to Full Volume Encryption (FVE) metadata blocks, as described in the diagram above. The 3 FVE metadata blocks all contain the same information. I assume this redundancy guarantees access to the cryptographic material in case of disk corruption.
An FVE metadata block may contain entries of various types, such as “Auto Unlock”, “Drive label”, “VMK”, or “FVEK”. This metadata can be partially read using ntfstool for instance. Nevertheless, I created my own one to have more control over what data is parsed and how.
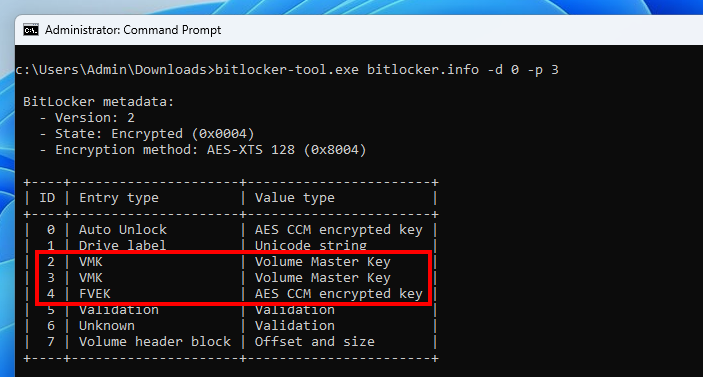
My VM has only 1 “physical” drive, so it has the ID 0, and the BitLocker partition has the ID 3. You can see that the FVE metadata contains 8 entries. Most notably, there are 2 entries of type “VMK” and 1 entry of type “FVEK”.
The Volume Master Key (VMK) is a 256-bit symmetric key that protects the Full Volume Encryption Key (FVEK). The FVEK is a 128 (default) or 256-bit symmetric key that is used to encrypt the data.
The VMK is stored encrypted on the disk using “key protectors”. The documentation of GetKeyProtectorType (Win32_EncryptableVolume WMI class) lists the following possible protectors.
- Trusted Platform Module (TPM)
- External key
- Numerical password
- TPM And PIN
- TPM And Startup Key
- TPM And PIN And Startup Key
- Public Key
- Passphrase
- TPM Certificate
- CryptoAPI Next Generation (CNG) Protector
The previous screenshot showed 2 VMK entries because 2 key protectors are configured: “TPM” and “Numerical Password“. This information can be confirmed with the command manage-bde -status.
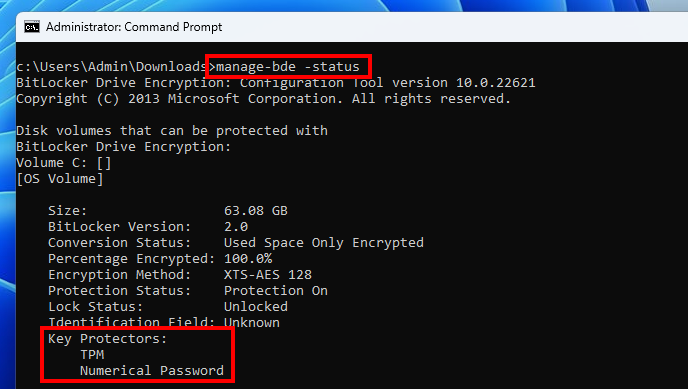
In other words, there are two distinct ways of obtaining the master key, either through the TPM, or by using the recovery password. In this post, I will discuss only the TPM key protector.
Further parsing is required for each protector. TPM-related data consists of a semi-opaque structure that can be broken down into 4 parts: a public part, a private part, a PCR digest, and a PCR bitmap.
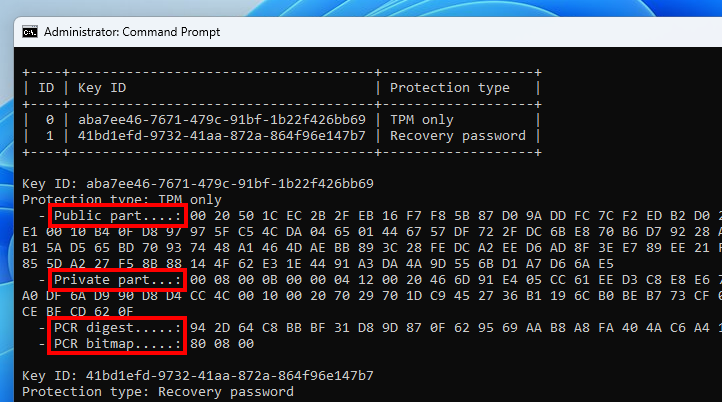
The public and private parts contain the material required to “unseal” the VMK. They are sent as is to the TPM to get the cleartext key, as we will see later in this post. What interests us here first is the PCR data.
A TPM is composed of several PCR banks. A PCR bank consists of a set of 16 to 24 PCRs using the same hash algorithm, such as SHA1 or SHA256. A Platform Configuration Register (PCR) is a volatile memory location that can be freely read, but can only be written using a “PCR extend” command. As described in the documentation, an “extend” operation consists in providing an arbitrary value to the TPM that will be used to compute a new hash as follows: PCR[N] = HASHalg(PCR[N] || ArgumentOfExtend). This guarantees that a PCR state cannot be rolled back or set to an arbitrary value. This cryptographic property is the cornerstone of the TPM model.
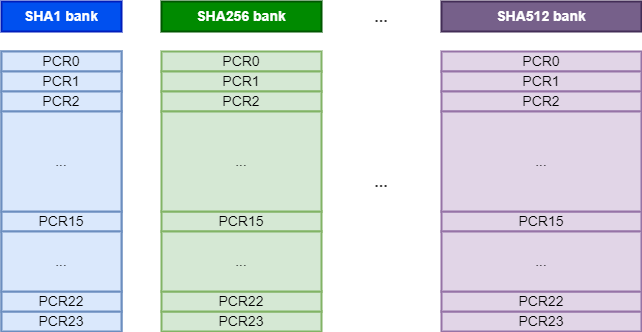
As I mentioned earlier, the FVE metadata contains a PCR digest and a PCR bitmap. The bitmap represents the registers that are currently used by Windows, as illustrated on the diagram below, and the digest represents the expected state of these registers when a request is sent to the TPM to unseal the VMK.
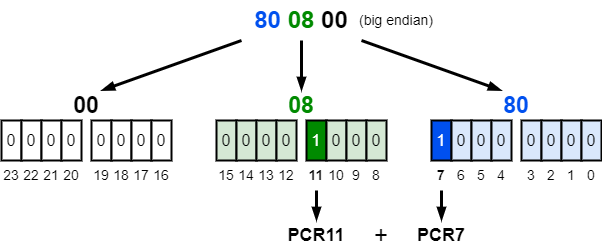
The value 80 08 00 indicates that the PCRs 7 and 11 are used. This can be confirmed with the command manage-bde -protectors -get C:. This is the default validation profile when Secure Boot is enabled. Otherwise, the PCRs 0, 2, 4 and 11 are used.
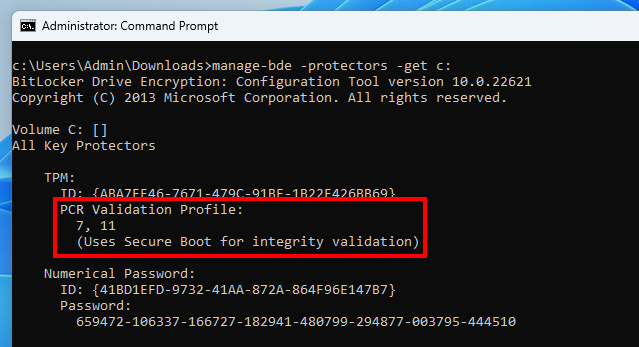
manage-bdeThe TPM2 specification (see TCG PC Client Platform Firmware Profile Specification – Table 1) defines the following PCR usage.
- PCR0 – SRTM, BIOS, Host Platform Extensions, Embedded Option ROMs and PI Drivers
- PCR2 – UEFI driver and application Code
- PCR4 – UEFI Boot Manager Code (usually the MBR) and Boot Attempts
- PCR7 – Secure Boot Policy
- PCR8-15 – Defined for use by the Static OS
The PCRs 0 to 7 are “reserved”, whereas the PCRs 8 to 15 are free to use by the “static” operating system. In the case of Windows, the PCR 11 is used for “BitLocker access control”. We will see what this means later in this post.
Note: in the TPM specification (see TCG PC Client Specific TPM Interface Specification (TIS)), the “static OS” is defined as “the operating system that is loaded during the initial boot sequence of the platform from its platform reset“. In our case, this would be the Windows Boot Manager.
In summary, when TPM-based BitLocker is enabled, some metadata containing a sealed version of the VMK is stored on the disk, alongside with a digest representing the expected state of a selection of PCRs. The TPM will only accept to unseal the VMK if this state is valid.
Interacting with the TPM
At this point, we know that if we do not alter the machine’s state, the PCR values will not be altered either, and thus we should be able to recover the VMK using the TPM from the Recovery Environment.
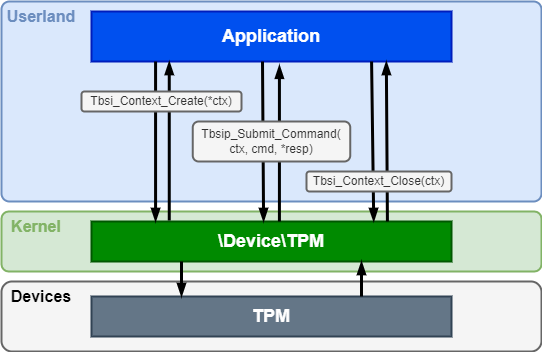
To do so, we first need to know how to interact with it. Fortunately, Windows provides a set of documented APIs exactly for that purpose, as part of the TPM Based Services (TBS). Three functions are required: Tbsi_Context_Create, Tbsip_Submit_Command, and Tbsip_Context_Close. These are basically wrappers for CreateFile, DeviceIoControl, and CloseHandle, that enable a userland caller to send commands to and receive responses from a TPM through a Kernel device object.
As for the commands themselves, they are defined in the Trusted Platform Module Library, Part 3. As an example, the picture below shows the format of the command TPM2_PCR_Extend (and its associated response). Structures are defined in the Trusted Platform Module Library, Part 2.
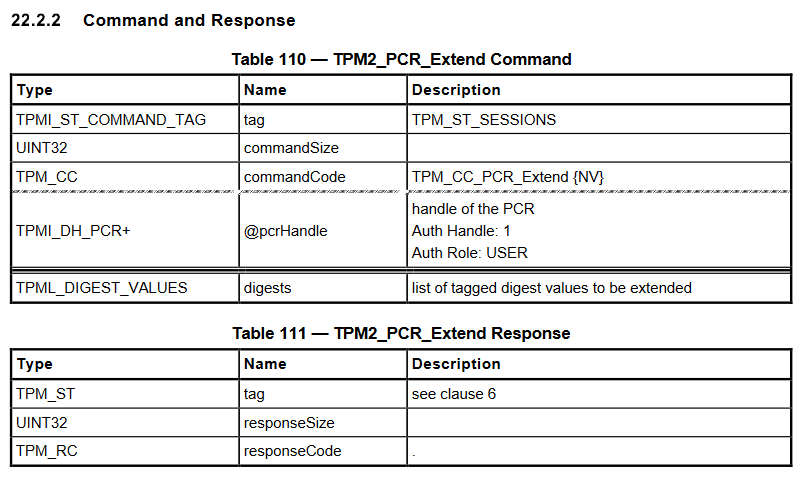
Discussing all the fields in detail in this post would be of no interest, but there are a couple of things worth mentioning:
- Commands have a common header: a 2-byte tag, a 4-byte command size, a 4-byte command code.
- Responses have a common header: a 2-byte tag a 4-byte response size, a 4-byte response code.
- Big-endianness is used when encoding integers.
To make this a bit more concrete, here is a sample C code snippet that reads the value of the 24 PCRs.
// Custom structures representing command and resp messages for the
// command TPM2_PCR_Read.
TPM2_PCRREAD_COMMAND req;
TPM2_PCRREAD_resp resp;
// The limit is 8 registers per read, so we need 3 iterations to get the
// value of all 24 PCRs.
for (int selection = 0; selection < 3; selection++) {
ZeroMemory(&req, sizeof(req));
// The output PE will use little endianness, so we need to convert
// shorts, integers, longs and so on.
req.tag = _byteswap_ushort(TPM_ST_NO_SESSIONS);
req.commandSize = _byteswap_ulong((UINT32)sizeof(req));
req.commandCode = _byteswap_ulong(TPM_CC_PCR_Read);
req.pcrSelectionIn.count = _byteswap_ulong(1);
req.pcrSelectionIn.pcrSelections[0].hash = _byteswap_ushort(AlgorithmId);
req.pcrSelectionIn.pcrSelections[0].sizeofSelect = sizeof(BYTE);
req.pcrSelectionIn.pcrSelections[0].pcrSelect[selection] = 0xff;
// SubmitCommand is my wrapper for Tbsip_Submit_Command. It takes care
// of initializing the context when it is first called.
SubmitCommand((PCBYTE)&req, sizeof(req), (PBYTE)&resp, &cbResult);
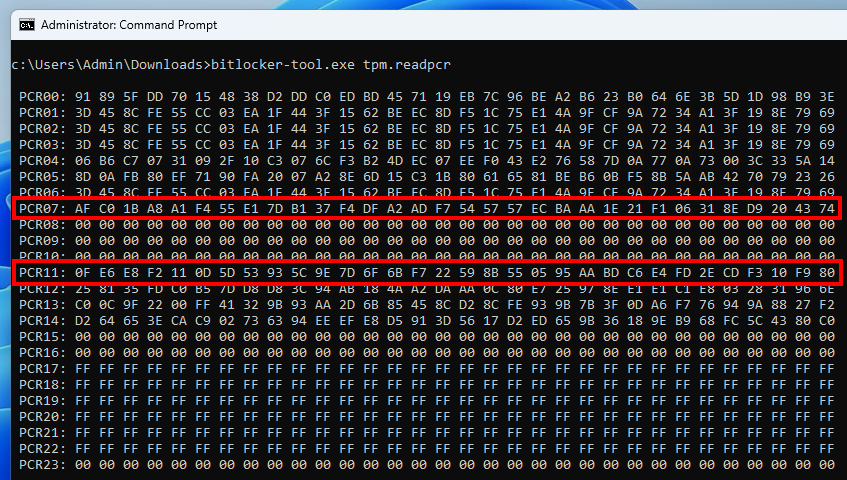
}This next screenshot shows the execution of this code from an active user session, after a full boot of the OS, while the main drive is unlocked.
This second screenshot was taken from the Recovery Environment of the same machine, while the main drive is locked.
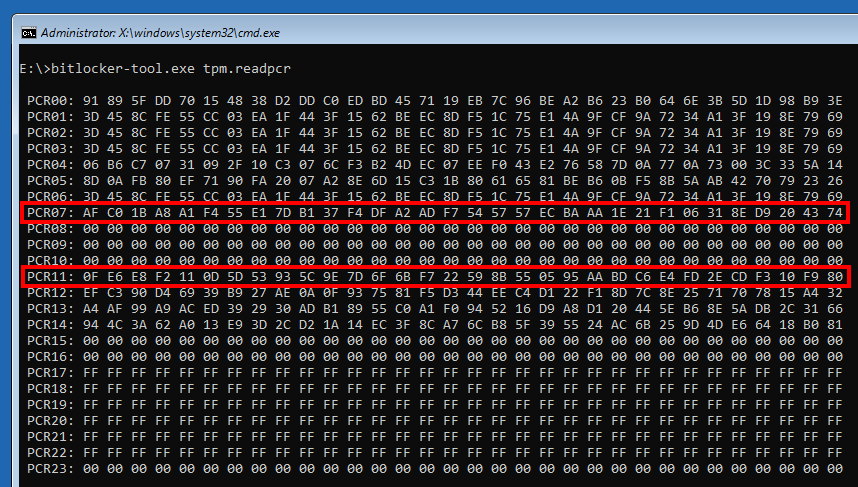
In these two command outputs, we can see that the values of the PCRs 7 and 11 are identical! So, in theory, we should be able to unseal the VMK. Let us go further down the rabbit hole…
BitLocker + TPM = VMK
Although the TPM2 specification is helpful to understand how to craft the messages and interpret the responses, it will not exactly tell us what sequence of commands must be sent to the TPM in order to recover the cleartext VMK.
Thankfully, we do not have to start from scratch as others have already paved the way. Seunghun Han, a researcher who specializes in areas such as firmware, hypervisor, and kernel security, gave a great talk at Black Hat Europe 2019 about a TPM vulnerability he found and exploited to bypass BitLocker Drive Encryption.
During his research, he had to analyze how BitLocker interacts with the TPM in order to unseal the VMK. To do so, he used a custom boot loader based on grub2. The purpose of this bootloader was to hook some of the functions used by the firmware to interact with the TPM before handing over the control to the Windows Boot Manager.
It was a bit of struggle to compile the project on a recent version of Ubuntu. I ended up installing the old version 18.04, which is probably the one the author used at the time. For reference, in case someone ever needs the commands, here is how I rebuilt the bootloader from the source.
# On Ubuntu 18.04
sudo apt-add-repository universe # required for package xorriso
sudo apt update
sudo apt install -y git dh-autoreconf bison flex libdevmapper-dev libfreetype6-dev xorriso python
git clone https://github.com/kkamagui/bitleaker-grub
cd bitleaker-grub
./linguas.sh
./autogen.sh
./configure --with-platform=efi --disable-werror --enable-grub-mkfont
make -j$(nproc)
sudo make install
sudo ln -s /usr/share/grub/unicode.pf2 /usr/local/share/grub/unicode.pf2
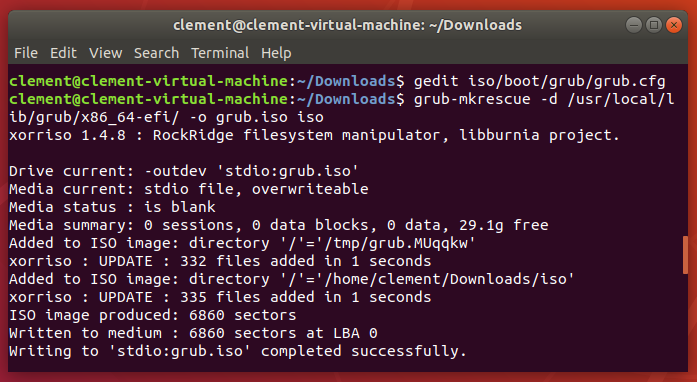
cd ..Once grub is built, a custom ISO can be generated as follows.
# Use -d to specify the location of the EFI binaries, otherwise it uses
# /usr/local/lib/grub/i386-pc/ by default.
# If the command fails with the error "grub-mkrescue: error: `mformat`
# invocation failed'", run 'sudo apt install -y mtools'.
grub-mkrescue -d /usr/local/lib/grub/x86_64-efi/ -o grub.iso
# Make directories for the custom config
mkdir -p iso/boot/grub
# Generate template grub config file
sudo grub-mkconfig -o iso/boot/grub/grub.cfg
# Add a menuentry to grub.cfg
# Update the ISO file
grub-mkrescue -d /usr/local/lib/grub/x86_64-efi/ -o grub.iso iso
Note that grub-mkconfig generates a default configuration file. Although it is recommended to use this file as a base template, and just add boot entries to it, I came up with the following stripped down version.
set timeout=30
terminal_input console
terminal_output gfxterm
insmod all_video
set gfxmode=auto
# To get the EFI partition's UUID, boot the machine using an Ubuntu
# live ISO, execute the command "sudo blkid" and search for an entry
# with the label "EFI system partition".
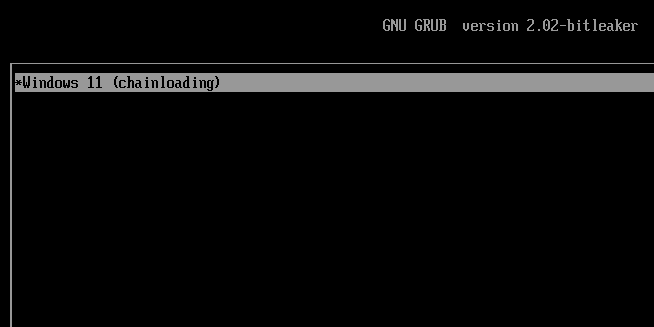
menuentry "Windows 11 (chainloading)" {
insmod part_gpt
insmod chain
search --no-floppy --set=root --fs-uuid DE43-AEFD
chainloader /EFI/Microsoft/Boot/bootmgfw.efi
}
To use the grub ISO in VMware Workstation, you can do the following:
- Shut down the Windows VM.
- Edit the VM’s settings, go to CD/DVD and set the path to the ISO file.
- Click VM > Power > Power On to firmware.
- In the firmware settings, increase the screen size (otherwise grub’s output will be truncated).
- Select the CD-ROM entry in the boot menu.
Note that this grub is not compatible with Secure Boot. Therefore, you have to temporarily disable it in the machine’s configuration. However, it must be re-enabled before the next Windows boot, otherwise it will be identified as a change in the Secure Boot policy, and you will be prompted to enter the recovery password.
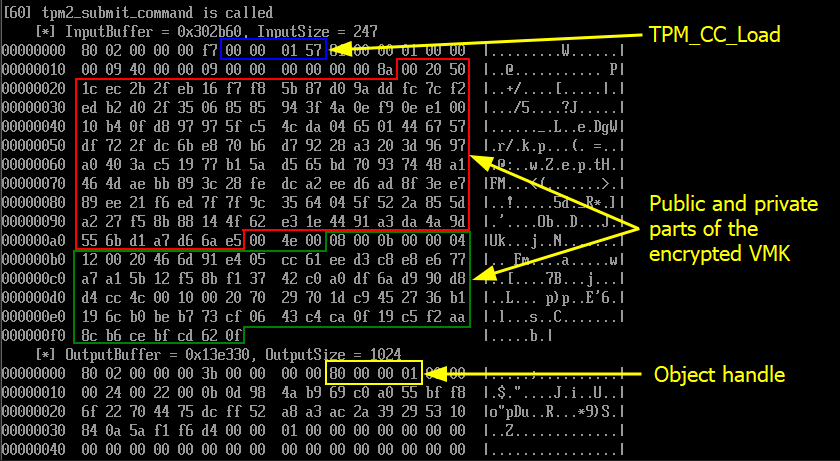
After installing its hooks, the bootloader starts intercepting the tpm2_submit_command calls. The interesting operations start at around event 60. As we will see on this next series of screenshots, unsealing the VMK is achieved in 5 steps.
-
TPM2_Load(handle, vmk_public_data, vmk_private_data)-> Object handle -
TPM2_StartAuthSession()-> Session handle TPM2_PolicyAuthValue(session_handle)TPM2_PolicyPCR(session_handle, pcr_digest, pcr_bitmap)- (
TPM2_Unseal(object_handle, session_handle)-> VMK)
The TPM2_Load command is used to tell the TPM that we want to unseal an object that was previously sealed by it. As long as the format is correct, the TPM should not return any error at this stage. It should simply acknowledge the operation by returning an object handle.
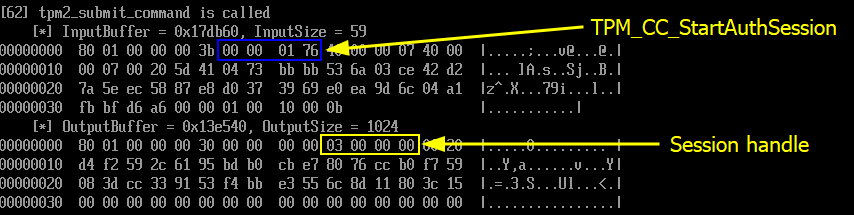
Next, independently from the previous operation, the client starts a new authorization session with the TPM2_StartAuthSession command, to which the TPM replies with a session handle.
Then, the TPM2_PolicyAuthValue command is used to indicate that the authorization session does not require a password (as we solely rely on the state of the PCRs).

Finally, here is the crucial step of the whole process. This is where we tell the TPM that authorization must be performed based on the state of a selection of PCRs. To do so, we include the PCR digest and the PCR bitmap I described earlier.
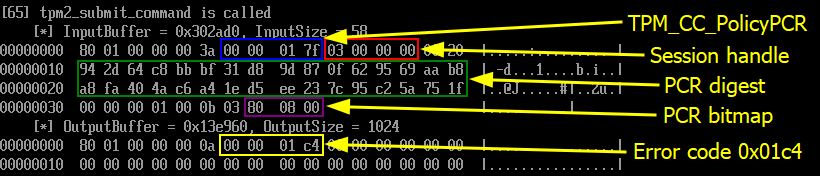
The TPM returns the error code 0x000001c4. We can use a tool such as tpm2_rc_decode (see tpm2-tools package) to interpret it. This way, we learn that it corresponds to the identifier TPM_RC_VALUE, which translates to the following in plain English: “value is out of range or is not correct for the context“.
This error is not surprising. The modification of the boot settings and the boot sequence impacted the value of PCR 7, and therefore the provided PCR digest is no longer valid in the current state of the TPM. Because of this error, we will not see the final call to TPM2_Unseal.
At this point, though, we have all the information we need to reproduce the first 4 steps of the process, and then attempt to unseal the VMK.
The “coup de gr√Ґce”
Reimplementing everything in C/C++ was tedious but not that complicated. Besides, I could rely on open source TPM tools for Linux when I was unsure about a specific format or structure.
Eventually, I was able to implement a new command – tpm.unseal – that takes care of extracting all the required material from the BitLocker metadata on the disk, and sending it to the TPM in order to unseal the VMK.
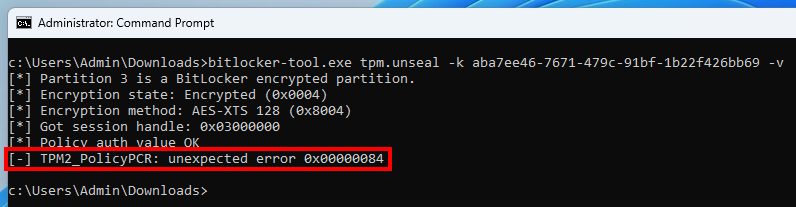
The outcome was not what I expected though. The command TPM2_PolicyPCR failed with the error code 0x00000084, which also translates to TPM_RC_VALUE, just in a different format.
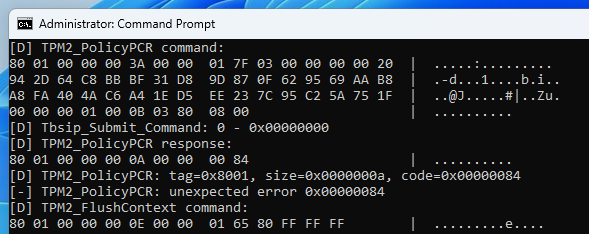
TPM2_PolicyPCR debug outputThe debug output of the command shows no particular issue. The format of the command seems correct. I went back and forth dozens of times between the specification and my code, but I could not spot any particular mistake.
To confirm whether my implementation was correct, I ran several unit tests using different PCR validation profiles. The table below shows the results.
Note: the PCR validation profile can be modified by editing the GPO Computer Configuration > Administrative Templates > Windows Components > BitLocker Drive Encryption > Operating System Drives.
| PCR selection | Unseal result | Comment |
|---|---|---|
| 7, 11 | вЫФ | Default PCR selection for UEFI + Secure Boot. Error 0x00000084 (TPM2_PolicyPCR) |
| 0 | вЬЕ | PCR 0 is not affected by a change of bootloader. |
| 0, 1, 2, 3 | вЬЕ | PCRs 0,1,2,3 are not affected by a change of bootloader. |
| 11 | вЫФ | PCR 11 is used for “BitLocker Access Control”. Error 0x00000084 (TPM2_PolicyPCR). |
| 7 | вЬЕ | PCR 7 holds the Secure Boot state. |
| 0, 2, 4 | вЬЕ | PCR selection for legacy BIOS mode without PCR11. Error 0x00000084 (TPM2_PolicyPCR). |
| 0, 2, 4, 11 | вЫФ | Default PCR selection for legacy BIOS mode. Error 0x00000084 (TPM2_PolicyPCR). |
First of all, with an intentionally weak validation profile such as “PCR 0+1+2+3”, I could confirm that my tool was able to recover the cleartext VMK. So, the good news is that my code is fine. But it’s also bad news as it means that the error is probably due to an external factor, out of my control.
Speaking of “control”, I previously mentioned that PCR 11 was used for “BitLocker access control”. At the time I did not know what this meant exactly. I did not find any resource discussing this mechanism in detail either. But this test summary table makes it very clear. Whatever the PCR selection, as long as PCR 11 is involved, the validation of the PCR policy fails.
For this very reason, it is not possible to unseal the VMK from within the Recovery Environment. But still, it does not tell us how this access control works in practice.
BitLocker access control
BitLocker Drive Encryption is usually enabled when the operating system is running. In this state, all the PCRs have their final value, including PCR 11. But, as we have seen, this value is apparently not the one used when sealing the VMK. So, what “magic” does BitLocker implement to seal the VMK using a PCR state that is different from the current one?
This question can be answered by analyzing how the VMK is sealed when enabling BitLocker. To do so, my initial idea was to create a DLL proxy for tbs.dll so that I could intercept the calls to Tbsip_Submit_Command, but this only worked partially.
The only way to make sure I could intercept all the calls was by hooking the commands implemented in the TPM driver, at the Kernel level. This is not an easy task though, at least for me, so I searched for already existing tools that would just do that.
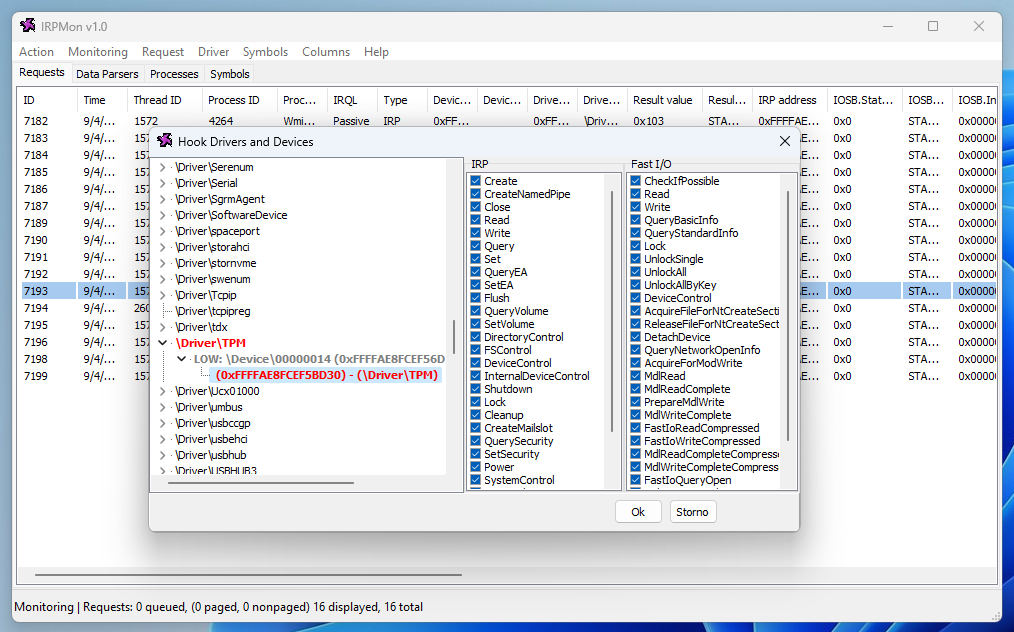
This first tool I found was IrpTracker, but it was last updated in 2010 and only supports Windows XP to Windows 7. And then, I came across the open source project IRPMon on GitHub. This turned out to be exactly the tool I needed!
Here are some small issues to be aware of though:
- The currently available release version is 0.8, but the pre-release versions bring essential features, such as packet inspection.
- It uses a custom driver that does not meet signing requirements (at least at the time of this research), and thus cannot be loaded if Driver Signature Enforcement (DSE) is enforced (default).
Rather than disabling DSE altogether, which could have had an impact on the PCRs’ state, my solution was to temporarily patch it in memory. The screenshot below shows how I did that through the known vulnerable driver RTCore64 (which is still not part of Microsoft’s block list at the time of writing). Note that this only works as long as HVCI is not enabled.
In its default configuration, IRPMon does not capture the content of each packet, so you have to make sure the “Data” option is checked when hooking a driver. Then, you can inspect a captured request or response and get a hexadecimal + ASCII representation of the packet.
IRPMon has another really cool feature. It allows users to add custom parsers implemented as external DLLs.
For this project, I created a basic parser that displays the content of a TPM command or response in a readable format.
TPM2_PCR_Read command packetFor instance, the screenshot above shows that a TPM2_PCR_Read command was sent to the TPM to get the value of PCR 7.
Armed with this new tool, I proceeded to inspect the TPM commands used by BitLocker when it creates and seals the VMK. The diagram below summarizes my observations.
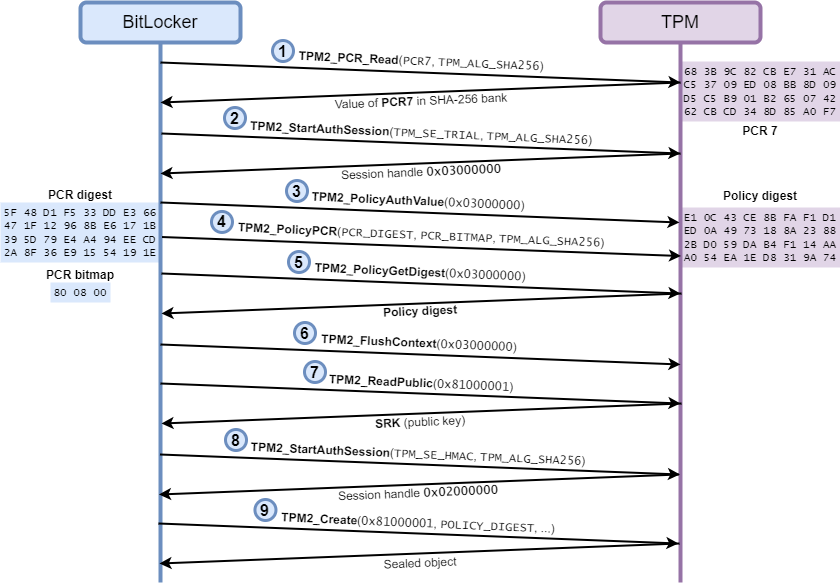
BitLocker first queries the value of PCR 7 in the SHA-256 bank (1). Then, it starts a new “trial” authorization session (2) and specifies that no password is required (3). And here is the crucial step of the process, it tells the TPM that authorization must be performed using the validation profile PCR 7+11 (4), and it gives it the expected PCR digest. In an actual authorization session, this command would have failed because this PCR digest is not correct in the current state of the selected PCRs, but since this a trial session, the TPM accepts the command and simply updates its internal policy digest accordingly.
After that, BitLocker queries the internal policy digest of the TPM for the current session (5), and ends the session by flushing the context (6). Finally, it reads the Storage Rook Key (SRK) (7), starts a new authorization session (8), and creates a new sealed object that is tied to the previously obtained policy digest (9).
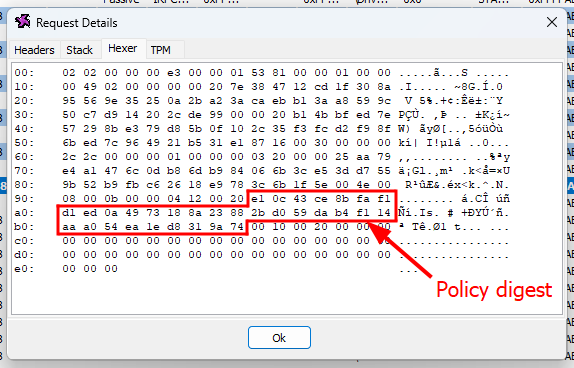
TPM2_Create commandYou can think of the policy digest as a way of keeping track of all the authorization checks and steps the caller must pass before being allowed to unseal a given object. When BitLocker sends the command TPM2_PolicyAuthValue, it affects the policy digest in a certain way. When it specifies the expected PCR digest with the command TPM2_PolicyPCR, it also updates the policy digest.
The only remaining question is: how does BitLocker calculate the PCR digest? We already know that it uses the final value of PCR 7, as illustrated on the previous diagram. This was also confirmed empirically through the various PCR validation profile experiments. So, what value does it use for PCR 11?
Thanks to the tool TBSLogGenerator from the Windows Hardware Lab Kit, we can decode the Measured Boot logs that are stored in C:\Windows\Logs\MeasuredBoot\, and obtain a trace showing all the values of the PCRs during the boot sequence. If you search for PCR 11 in those logs, you should see only 2 values:
PCR[11] = 7366e3e017f2a466c909c2f4c2419b0a1587f07b3085218fc5790181786d6c4a
PCR[11] = 0fe6e8f2110d5d53935c9e7d6f6bf722598b550595aabdc6e4fd2ecdf310f980
So, if we compute SHA256( PCR07 || PCR11 ) with these two values, we should be able to find which one was used to obtain the policy digest by comparing the resulting hashes, right?
PCR[07] = "683B9C82CBE731ACC53709ED08BB8D09D5C5B901B265074262CBCD348D85A0F7"
PCR[11] = "7366e3e017f2a466c909c2f4c2419b0a1587f07b3085218fc5790181786d6c4a"
EXPECTED_DIGEST = "5F48D1F533DDE366471F12968BE6171B395D79E4A494EECD2A8F36E91554191E"
COMPUTED_DIGEST = "7a6a33a4f28e201ae8a109fe2ca4b09d73dbaa9406f0f4d48902bab664f1660c"
// -> Digests do not match

PCR[07] = "683B9C82CBE731ACC53709ED08BB8D09D5C5B901B265074262CBCD348D85A0F7"
PCR[11] = "0fe6e8f2110d5d53935c9e7d6f6bf722598b550595aabdc6e4fd2ecdf310f980"
EXPECTED_DIGEST = "5F48D1F533DDE366471F12968BE6171B395D79E4A494EECD2A8F36E91554191E"
COMPUTED_DIGEST = "e1ab66599e9cfce99271a030793282b9483378a639351a11774436a5988f3f8a"
// -> Digests do not match
Well, I did that, and it did not work. It turns out I was just overthinking it, and the solution was actually very simple. I completely omitted the fact that, in their initial state, all the bits of the PCRs are set to zero. If you calculate SHA256( PCR07 || 00000...00 ), you will indeed find the expected PCR digest.
PCR[07] = "683B9C82CBE731ACC53709ED08BB8D09D5C5B901B265074262CBCD348D85A0F7"
PCR[11] = "0000000000000000000000000000000000000000000000000000000000000000"
EXPECTED_DIGEST = "5F48D1F533DDE366471F12968BE6171B395D79E4A494EECD2A8F36E91554191E"
COMPUTED_DIGEST = "5f48d1f533dde366471f12968be6171b395d79e4a494eecd2a8f36e91554191e"
// -> Digests match!
In conclusion, BitLocker uses the PCR 11 as a “lock”. When the machine boots, this lock is open. The Windows Boot Manager sends the necessary commands to the TPM to unseal the VMK. This works as long as PCR 7 is in its expected state. Then, BitLocker extends PCR 11, thus effectively closing the “lock”. From this point on, any subsequent piece of software that would try to unseal the VMK would fail as the state of this PCR is no longer valid in regards to the authorization policy tied to the sealed VMK.
Final considerations
Before concluding this post, which is already too long, I would like to mention several other attacks I considered during this research.
As we have seen in the previous part, access to the VMK is controlled through the state of PCR 11. For us to be able to unseal the VMK, the value of this register must be an all-zero hash. If we go through the TPM2 specification, we can see that there is a command called TPM2_PCR_Reset that may be used to set a PCR in all banks to zero.
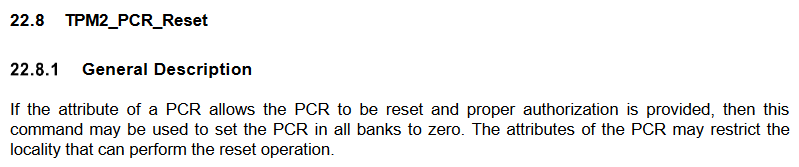
TPM2_PCR_Reset commandHowever, this operation is only allowed for resettable PCRs. According to the specification, only PCRs 16 to 23 are supposed to be resettable. So, out of curiosity, I implemented the command and tested it on PCR 11.
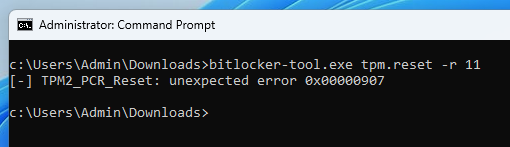
The command unsurprisingly fails with the error code 0x0907 (TPM_RC_LOCALITY), which is the error code the TPM must return when an attempt is made to reset a non-resettable PCR, according to the specification.
The other interesting thing I noticed is that the values of PCR 11 seem to always be the same. So, in theory, if you found a value such that SHA256( 0FE6E8F2...F310F980 || VALUE ) = 0000...00, you would be able to use the command TPM2_PCR_Extend to essentially reset this PCR, and thus unlock any TPM-based BitLocker-encrypted drive. Good luck with that though!
Finally, what about TPM+PIN authentication? Although BitLocker can be configured to accept 4-digit PIN codes, the default minimum length is 6 digits. Even then, one could think that such a code is relatively easy to bruteforce. It is not that simple though. The PIN code is not handled by BitLocker directly, it is used during the authorization process on the TPM. The latter has an anti-hammering protection that makes it enter a lockout mode after a pre-defined number of failed authorizations. An internal lockout counter is decremented after a given cooldown delay, but it can also be reset manually by the TPM’s “owner”.
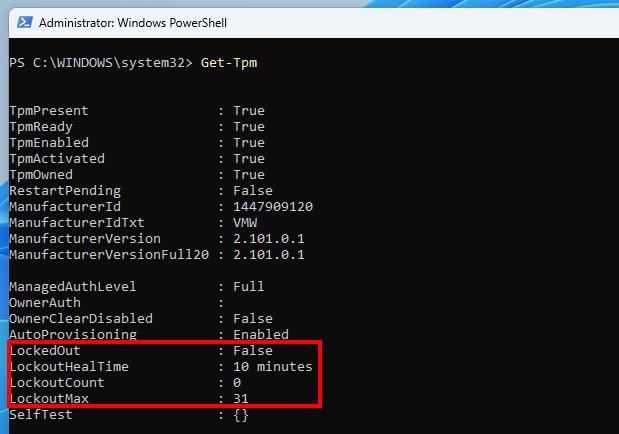
Get-TpmThe PowerShell command Get-Tpm shows the current lockout state. Here, the lockout count is 0, and the maximum number of failed authorizations before a lockout is 31.
Because of this anti-hammering mechanism, even a 6-digit code, as long as it is not something as trivial as “123456”, offers a strong protection. On top of that, it protects against TPM sniffing attacks as the PIN code is required for the TPM to unseal the VMK.
Conclusion
This research started with a misconception about how TPM-based BitLocker Drive Encryption works in practice. The initial assumption was that, if the boot sequence is not altered, the PCRs are not altered either, and therefore it is possible to unseal the VMK past this point.
The conclusion will sound obvious to low-level OS and firmware specialists, but this assumption was highly incorrect. As we have seen, whichever BIOS mode is used (legacy BIOS, UEFI, or UEFI + Secure Boot), PCR 11 plays a key role in protecting access to the VMK. It ensures that only the Windows Boot Manager can unseal it through the TPM.
Lastly, in her talk entitled Deep Attack Surfaces, Shallow Bugs (SSTIC 2023), Valentina Palmiotti (a.k.a. @chompie1337) mentioned that security researchers rarely publish their failed research. Although I am not a security researcher per se, I took her remark into account, which served as an extra motivation to write this post despite not having found any cool bug or new technique. Besides, I hope it will provide complementary explanations or information to what is already publicly available.