In 2018, James Forshaw published an article in which he briefly mentioned a trick that could be used to inject arbitrary code into a PPL as an administrator. However, I feel like this post did not get the attention it deserved as it literally described a potential Userland exploit for bypassing PPL (which includes LSA Protection).
Introduction
I was doing some research on Protected Processes when I stumbled upon the following blog post: Windows Exploitation Tricks: Exploiting Arbitrary Object Directory Creation for Local Elevation of Privilege. This post was written by James Forshaw on Project Zero’s blog in August 2018. As the title implies, the objective was to discuss a particular privilege escalation trick, not a PPL bypass. However, the following sentence immediately caught my eye:
Abusing the DefineDosDevice API actually has a second use, it’s an Administrator to Protected Process Light (PPL) bypass.
As far as I know, all the public tools for bypassing PPL that have been released so far involve the use of a driver in order to execute arbitrary code in the Kernel (with the exception of pypykatz as I mentioned in my previous post). In his blog post though, James Forshaw casually gave us a Userland bypass trick on a plate, and it seems it went quite unnoticed by the pentesting community.
The objective of this post is to discuss this technique in more details. I will first recap some key concepts behind PPL processes, and I will also explain one of the major differences between a PP (Protected Process) and a PPL (Protected Process Light). Then, we will see how this slight difference can be exploited as an administrator. Finally, I will introduce the tool I developed to leverage this vulnerability and dump the memory of any PPL without using any Kernel code.
Background
I already laid down all the core principles behind PP(L)s on my personal blog here: Do You Really Know About LSA Protection (RunAsPPL)?. So, I would suggest reading this post first but here is a TL;DR.
PP(L) Concepts – TL;DR
When the PP model was first introduced with Windows Vista, a process was either protected or unprotected. Then, beginning with Windows 8.1, the PPL model extended this concept and introduced protection levels. The immediate consequence is that some PP(L)s can now be more protected than others. The most basic rule is that an unprotected process can open a protected process only with a very restricted set of access flags such as PROCESS_QUERY_LIMITED_INFORMATION. If they request a higher level of access, the system will return an Access is Denied error.
For PP(L)s, it’s a bit more complicated. The level of access they can request depends on their own level of protection. This protection level is partly determined by a special EKU field in the file’s digital certificate. When a protected process is created, the protection information is stored in a special value in the EPROCESS Kernel structure. This value stores the protection level (PP or PPL) and the signer type (e.g.: Antimalware, Lsa, WinTcb, etc.). The signer type establishes a sort of hierarchy between PP(L)s. Here are the basic rules that apply to PP(L)s:
- A PP can open a PP or a PPL with full access if its signer type is greater or equal.
- A PPL can open a PPL with full access if its signer type is greater or equal.
- A PPL cannot open a PP with full access, regardless of its signer type.
For example, when LSA Protection is enabled, lsass.exe is executed as a PPL, and you will observe the following protection level with Process Explorer: PsProtectedSignerLsa-Light. If you want to access its memory you will need to call OpenProcess and specify the PROCESS_VM_READ access flag. If the calling process is not protected, this call will immediately fail with an Access is Denied error, regardless of the user’s privileges. However, if the calling process were a PPL with a higher level (WinTcb for instance), the same call would succeed (as long as the user has the appropriate privileges obviously). As you will have understood, if we are able to create such a process and execute arbitrary code inside it, we will be able to access LSASS even if LSA Protection is enabled. The question is: can we achieve this goal without using any Kernel code?
PP vs PPL
The PP(L) model effectively prevents an unprotected process from accessing protected processes with extended access rights using OpenProcess for example. This prevents simple memory access, but there is another aspect of this protection I did not mention. It also prevents unsigned DLLs from being loaded by these processes. This makes sense, otherwise the overall security model would be pointless as you could just use any form of DLL hijacking and inject arbitrary code into your own PPL process. This also explains why a particular attention should be paid to third-party authentication modules when enabling LSA Protection.
There is one exception to this rule though! And this is probably where the biggest difference between a PP and a PPL lies. If you know about the DLL search order on Windows, you know that, when a process is created, it first goes through the list of “Known DLLs”, then it continues with the application’s directory, the System directories and so on… In this search order, the “Known DLLs” step is a special one and is usually taken out of the equation for DLL hijacking exploits because a user has no control over it. Though, in our case, this step is precisely the “Achille’s heel” of PPL processes.
The “Known DLLs” are the DLLs that are most commonly loaded by Windows applications. Therefore, to increase the overall performance, they are preloaded in memory (i.e. they are cached). If you want to see the complete list of “Known DLLs”, you can use WinObj and take a look a the content of the \KnownDlls directory within the object manager.
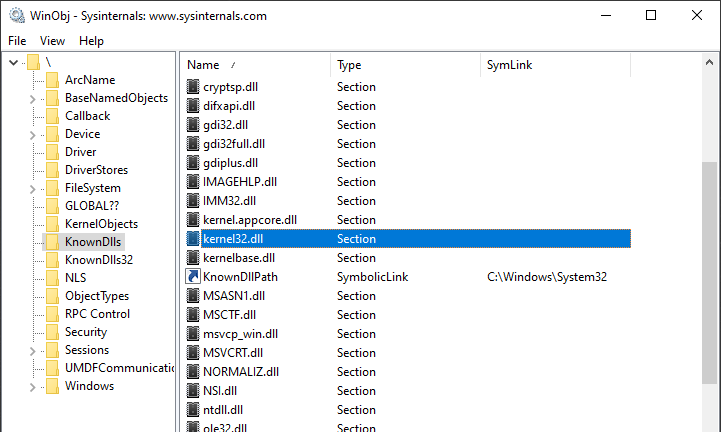
Since these DLLs are already in memory, you should not see them if you use Process Monitor to check the file operations of a typical Windows application. Things are a bit different when it comes to Protected Processes though. I will take SgrmBroker.exe as an example here.
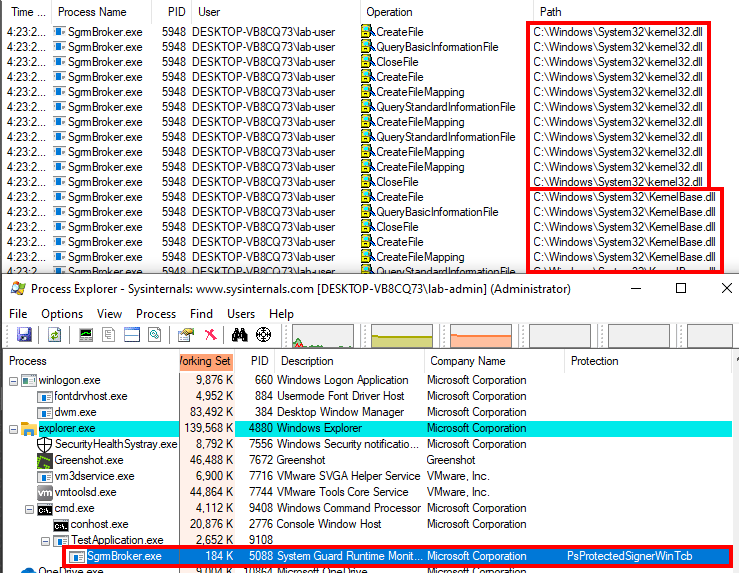
As we can see in Process Explorer, SgrmBroker.exe was started as a Protected Process (PP). When the process starts, the very first DLLs that are loaded are kernel32.dll and KernelBase.dll, which are both… …”Known DLLs”. Yes, in the case of a PP, even the “Known DLLs” are loaded from the disk, which implies that the digital signature of each file is always verified. However, if you do the same test with a PPL, you will not see these DLLs in Process Monitor as they behave like normal processes in this case.
This fact is particularly interesting because the digital signature of a DLL is only verified when the file is mapped, i.e. when a Section is created. This means that, if you are able to add an arbitrary entry to the \KnownDlls directory, you can then inject an arbitrary DLL and execute unsigned code in a PPL.
Adding an entry to \KnownDlls is easier said than done though because Microsoft already considered this attack vector. As explained by James Forshaw in his blog post, the \KnownDlls object directory is marked with a special Process Trust Label as you can see on the screenshot below.
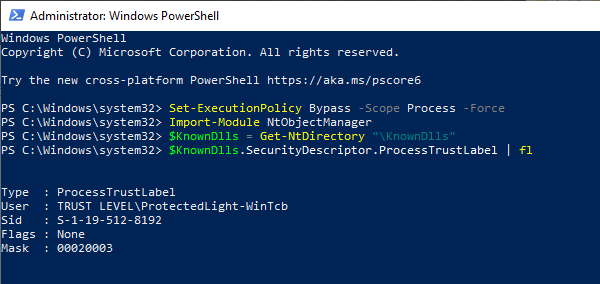
As you may imagine, based on the name of the label, only protected processes that have a level higher than or equal to WinTcb – which is actually the highest level for PPLs – can request write access to this directory. But all is not lost as this is exactly where the clever trick found by JF comes into play.
MS-DOS Device Names
As mentioned in the introduction, the technique found by James Forshaw relies on the use of the API function DefineDosDevice, and involves some Windows internals that are not easy to grasp. Therefore, I will first recap some of these concepts here before dealing with the method itself.
DefineDosDevice?
Here is the prototype of the DefineDosDevice function:
BOOL DefineDosDeviceW(
  DWORD   dwFlags,
  LPCWSTR lpDeviceName,
  LPCWSTR lpTargetPath
);
As suggested by its name, the purpose of the DefineDosDevice is to literally define MS-DOS device names. An MS-DOS device name is a symbolic link in the object manager with a name of the form \DosDevices\DEVICE_NAME (e.g.: \DosDevices\C:) as explained in the documentation. So, this function allows you to map an actual “Device” to a “DOS Device”. This is exactly what happens when you plug in an external drive or a USB key for example. The device is automatically assigned a drive letter, such as E:. You can get the corresponding mapping by invoking QueryDosDevice.
WCHAR path[MAX_PATH + 1];

if (QueryDosDevice(argv[1], path, MAX_PATH)) {
    wprintf(L"%ws -> %ws\n", argv[1], path);
}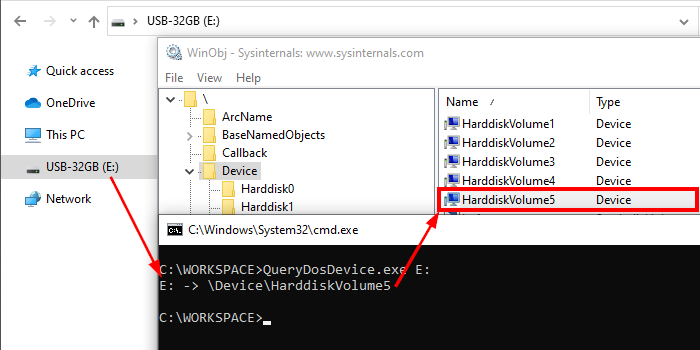
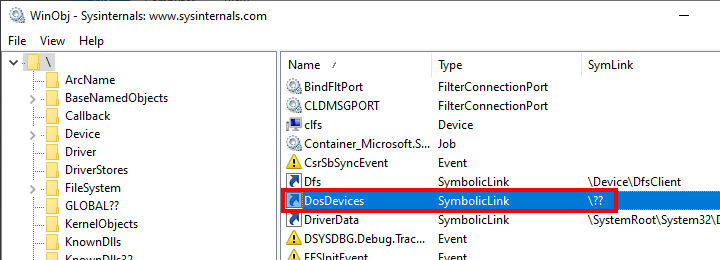
In the above example, the target device is \Device\HarddiskVolume5 and the MS-DOS device name is E:. But wait a minute, I said that an MS-DOS device name was of the form \DosDevices\DEVICE_NAME. So, this cannot be just a drive letter. No worries, there is an explanation. For both DefineDosDevice and QueryDosDevice, the \DosDevices\ part is implicit. These functions automatically prepend the “device name” with \??\. So, if you provide E: as the device name, they will use the NT path \??\E: internally. Even then, you will tell me that \??\ is still not \DosDevices\, and this would be a valid point. Once again, WinObj will help us solve this “mystery”. In the root directory of the object manager, we can see that \DosDevices is just a symbolic link that points to \??. As a result, \DosDevices\E: -> \??\E:, so we can consider them as the same thing. This symbolic link actually exists for legacy reasons because, in older versions of Windows, there was only one DOS device directory.
Local DOS Device Directories
The path prefix \??\ itself has a very special meaning. It represents the local DOS device directory of a user and therefore refers to different locations in the object manager, depending on the current user’s context. Concretely, \?? refers to the full path \Sessions\0\DosDevices\00000000-XXXXXXXX, where XXXXXXXX is the user’s logon authentication ID. There is one exception though, for NT AUTHORITY\SYSTEM, \?? refers to \GLOBAL??. This concept is very important so I will take two examples to illustrate it. The first one will be the USB key I used previously and the second one will be an SMB share I manually mount through the Explorer.
In the case of the USB key, we already saw that \??\E: was a symbolic link to \Device\HarddiskVolume5. As it was mounted by SYSTEM, this link should exist within \GLOBAL??\. Let’s verify that with WinObj.
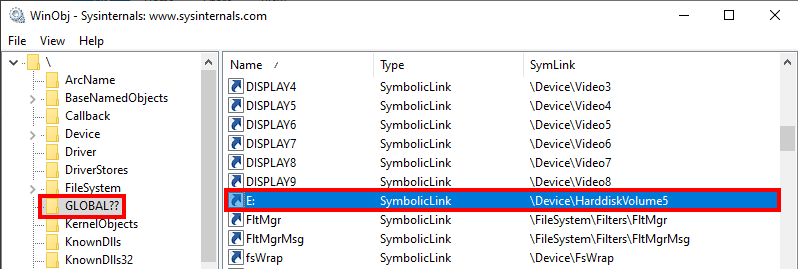
Everything is fine! Now, let’s map an “SMB share” to a drive letter and see what happens.
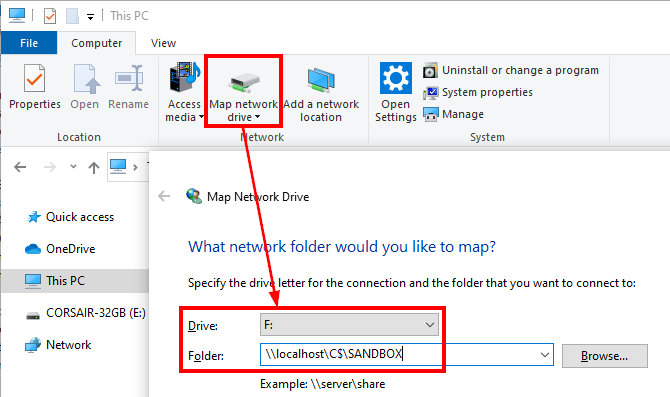
This time, the drive is mounted as the logged-on user, so \?? should refer to \Sessions\0\DosDevices\00000000-XXXXXXXX, but what is the value of XXXXXXXX? To find it, I will use Process Hacker and check the advanced properties of my explorer.exe process’ primary access token.
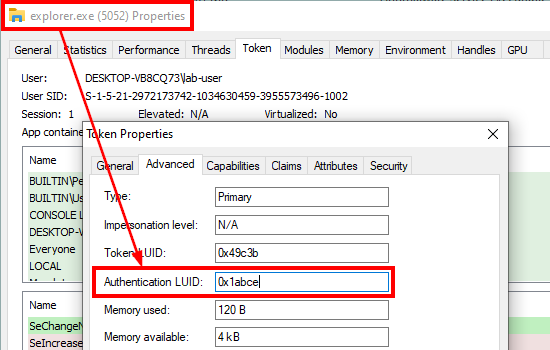
The authentication ID is 0x1abce so the symbolic link should have been created inside \Sessions\0\DosDevices\00000000-0001abce. Once again, let’s verify that with WinObj.
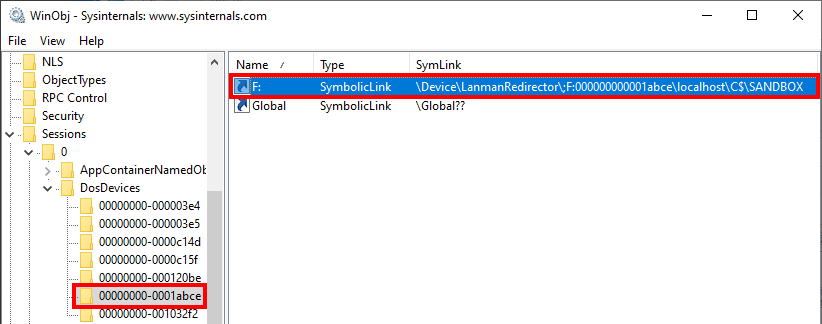
There it is! The symbolic link was indeed created in this directory.
Why DefineDosDevice?
As we saw in the previous part, the device mapping operation consists of a simple symbolic link creation in the caller’s DOS device directory. Any user can do that as it affects only their session. But there is a problem, because low-privileged users can only create “Temporary” kernel objects, which are removed once all their handles have been closed. To solve this problem, the object must be marked as “Permanent“, but this requires a particular privilege (SeCreatePermanentPrivilege) which they do not have. So, this operation must be performed by a privileged service that has this capability.
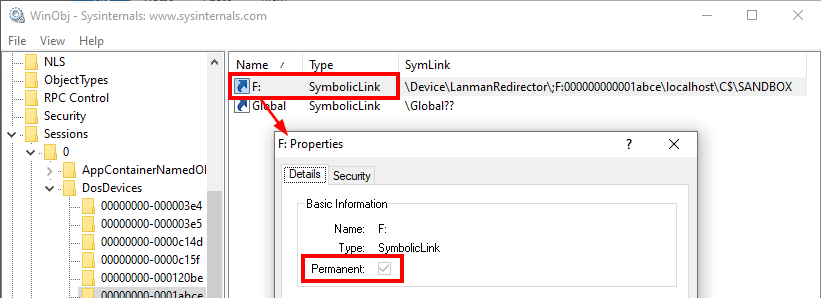
As outlined by JF in his blog post, DefineDosDevice is just a wrapper for an RPC method call. This method is exposed by the CSRSS service and is implemented in BaseSrvDefineDosDevice inside BASESRV.DLL. What is special about this service is that it runs as a PPL with the protection level WinTcb.

Although this is a requirement for our exploit, it is not the most interesting fact about DefineDosDevice. What is even more interesting is that the value of lpDeviceName is not sanitized. This means that you are not bound to provide a drive letter such as E:. We will see how we can leverage this to trick the CSRSS service into creating an arbitrary symbolic link in an arbitrary location such as \KnownDlls.
Exploiting DefineDosDevice
In this part, we will take a deep dive into the DefineDosDevice function. We will see what kind of weakness lies inside it and how we can exploit it to reach our goal.
The Inner Workings of DefineDosDevice
In his article, JF did all the heavy lifting as he reversed the BaseSrvDefineDosDevice function and provided us with the corresponding pseudo-code. You can check it out here. If you do so, you should note that there is slight mistake at step 4 though, it should be CsrImpersonateClient(), not CsrRevertToSelf(). Anyway, rather than copy-pasting his code, I will try to provide a high-level overview using a diagram instead.
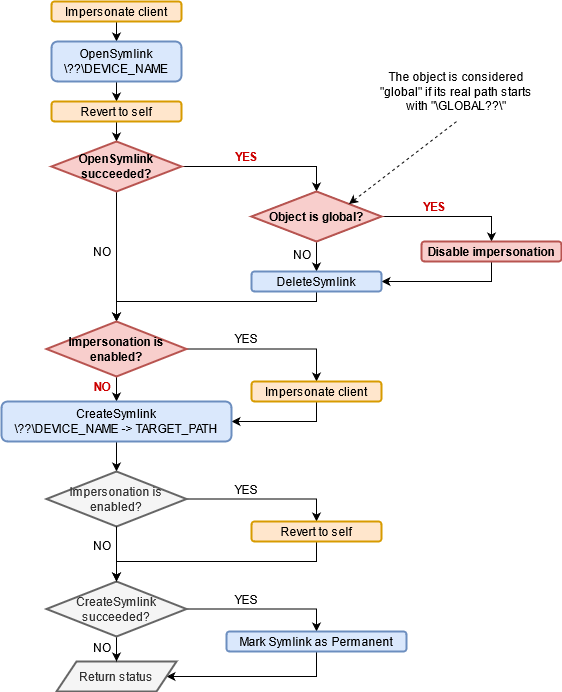
In this flowchart, I highlighted some elements with different colors. The impersonation functions are in orange and the symbolic link creation steps are in blue. Finally, I highlighted the critical path we need to take in red.
First, we can see that the CSRSS service tries to open \??\DEVICE_NAME while impersonating the caller (i.e. the RPC client). The main objective is to delete the symbolic link first if it already existed. But there is more to it, the service will also check whether the symbolic link is “global”. For that purpose, an internal function, which is not represented here, simply checks whether the “real” path of the object starts with \GLOBAL??\. If so, impersonation is disabled for the rest of the execution and the service will not impersonate the client prior to the NtCreateSymbolicLinkObject() call, which means that the symbolic link will be created by the CSRSS service itself. Finally, if this operation succeeds, the service marks the object as “Permanent” as I mentioned earlier.
A Vulnerability?
At this point you may have realized that there is a sort of TOCTOU (Time-of-Check Time-of-Use) vulnerability. The path used to open the symbolic link and the path used to create it are the same: \??\DEVICE_NAME. However, the “open” operation is always done while impersonating the user whereas the “create” operation might be done directly as SYSTEM if impersonation is disabled. And, if you remember what I explained earlier, you know that \?? represents a user’s local dos device directory and therefore resolves to different paths depending on the user’s identity. So, although the same path is used in both cases, it may well refer to completely different locations in reality!
In order to exploit this behavior, we must solve the following challenge: we need to find a “device name” that resolves to a “global object” we control when the service impersonates the client. And this same “device name” must resolve to \KnownDlls\FOO.dll when impersonation is disabled. This sounds a bit tricky, but we will go through it step by step.
Let’s begin with the easiest part first. We need to determine a value for DEVICE_NAME in \??\DEVICE_NAME such that this path resolves to \KnownDlls\FOO.dll when the caller is SYSTEM. We also know that \?? resolves to \GLOBAL?? in this case.
If you check the content of the \GLOBAL??\ directory, you will see that there is a very convenient object inside it.

In this directory, the GLOBALROOT object is a symbolic link that points to an empty path. This means that a path such as \??\GLOBALROOT\ would translate to just \, which is the root of the object manager (hence the name “global root”). If we apply this principle to our “device name”, we know that \??\GLOBALROOT\KnownDlls\FOO.DLL would resolve to \KnownDlls\FOO.dll when the caller is SYSTEM. This is one part of the problem solved!
Now, we know that we should supply GLOBALROOT\KnownDlls\FOO.DLL as the “device name” for the DefineDosDevice function call (remember that \??\ will be automatically prepended to this value). If we want the CSRSS service to disable impersonation, we also know that the symbolic link object must be considered as “global” so its path must start with \GLOBAL??\. So, the question is: how do you transform a path such as \??\GLOBALROOT\KnownDlls\FOO.DLL into \GLOBAL??\KnownDlls\FOO.dll? The solution is actually quite straightforward as this is pretty much the very definition of a symbolic link! When the service impersonates the user, we know that \?? refers to the local DOS device directory of this particular user, so all you have to do is create a symbolic link such that \??\GLOBALROOT points to \GLOBAL??, and that’s it.
To summarize, when the path is opened by a user other than SYSTEM:
\??\GLOBALROOT\KnownDlls\FOO.dll
-> \Sessions\0\DosDevices\00000000-XXXXXXXX\GLOBALROOT\KnownDlls\FOO.dll

\Sessions\0\DosDevices\00000000-XXXXXXXX\GLOBALROOT\KnownDlls\FOO.dll
-> \GLOBAL??\KnownDlls\FOO.dll
On the other hand, if the same path is opened by SYSTEM:
\??\GLOBALROOT\KnownDlls\FOO.dll
-> \GLOBAL??\GLOBALROOT\KnownDlls\FOO.dll

\GLOBAL??\GLOBALROOT\KnownDlls\FOO.dll
-> \KnownDlls\FOO.dll
There is one last thing that needs to be taken care of. Before checking whether the object is “global” or not, it must first exist, otherwise the initial “open” operation would just fail. So, we need to make sure that \GLOBAL??\KnownDlls\FOO.dll is an existing symbolic link object prior to calling DefineDosDevice.
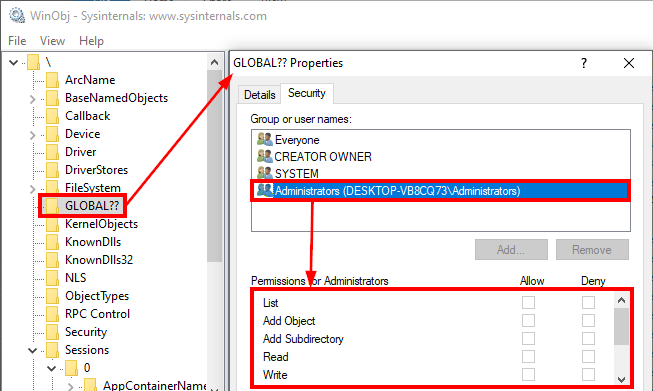
There is a slight issue here. Administrators cannot create objects or even directories within \GLOBAL??. This is not really a problem; this just adds an extra step to our exploit as we will have to temporarily elevate to SYSTEM first. As SYSTEM, we will be able to first create a fake KnownDlls directory inside \GLOBAL??\ and then create a dummy symbolic link object inside it with the name of the DLL we want to hijack.
The Full Exploit
There is a lot of information to digest so, here is a short recap of the exploit steps before we discuss the last considerations. In this list, we assume we are executing the exploit as an administrator.
- Elevate to
SYSTEM, otherwise we will not be able to create objects inside\GLOBAL??. - Create the object directory
\GLOBAL??\KnownDllsto mimic the actual\KnownDllsdirectory. - Create the symbolic link
\GLOBAL??\KnownDlls\FOO.dll, whereFOO.dllis the name of the DLL we want to hijack. Remember that what matters is the name of the link itself, not its target. - Drop the
SYSTEMprivileges and revert to our administrator user context. - Create a symbolic link in the current user’s DOS device directory called
GLOBALROOTand pointing to\GLOBAL??. This step must not be done asSYSTEMbecause we want to create a fakeGLOBALROOTlink inside our own DOS directory. - This is the centerpiece of this exploit. Call
DefineDosDevicewith the valueGLOBALROOT\KnownDlls\FOO.dllas the device name. The target path of this device is the location of the DLL but I will get to that in the next part.
Here is what happens inside the CSRSS service at the final step. It first receives the value GLOBALROOT\KnownDlls\FOO.dll and prepends it with \??\ so this yields the device name \??\GLOBALROOT\KnownDlls\FOO.dll. Then, it tries to open the corresponding symbolic link object while impersonating the client.
\??\GLOBALROOT\KnownDlls\FOO.dll
-> \Sessions\0\DosDevices\00000000-XXXXXXXX\GLOBALROOT\KnownDlls\FOO.dll
-> \GLOBAL??\KnownDlls\FOO.dll
Since the object exists, it will check if it’s global. As you can see, the “real” path of the object starts with \GLOBAL??\ so it’s indeed considered global, and impersonation is disabled for the rest of the execution. The current link is deleted and a new one is created, but this time, the RPC client is not impersonated, so the operation is done in the context of the CSRSS service itself as SYSTEM:
\??\GLOBALROOT\KnownDlls\FOO.dll
-> \GLOBAL??\GLOBALROOT\KnownDlls\FOO.dll
-> \KnownDlls\FOO.dll
Here we go! The service creates the symbolic link \KnownDlls\FOO.dll with a target path we control.
DLL Hijacking through Known DLLs
Now that we know how to add an arbitrary entry to the \KnownDlls directory, we should come back to our original problem, and our exploit constraints.
Which DLL to Hijack?
We want to execute arbitrary code inside a PPL, and ideally with the signer type “WinTcb”. So, we need to find a suitable executable candidate first. On Windows 10, four built-in binaries can be executed with such a level of protection as far as I know: wininit.exe, services.exe, smss.exe and csrss.exe. smss.exe and csrss.exe cannot be executed in Win32 mode so we can eliminate them. I did a few tests with wininit.exe but letting this binary run as an administrator with debug privileges is a bad idea. Indeed, there is a high chance it will mark itself as a Critical Process, meaning that when it terminates, the system will likely crash with a BSOD.
This leaves us with only one potential candidate: services.exe. As it turns out, this is the perfect candidate for our purpose. Its main function is very easy to decompile and understand. Here is the corresponding pseudo-code.
int wmain()
{
    HANDLE hEvent;
    hEvent = OpenEvent(SYNCHRONIZE, FALSE, L"Global\\SC_AutoStartComplete");
    if (hEvent) {
        CloseHandle(hEvent);
    } else {
        RtlSetProcessIsCritical(TRUE, NULL, FALSE);
        if (NT_SUCCESS(RtlInitializeCriticalSection(&CriticalSection))
            SvcctrlMain();
    }
    return 0;
}
It first tries to open a global Event object. If it worked, the handle is closed, and the process terminates. The actual main function SvcctrlMain() is executed only if this Event object does not exist. This makes sense, this simple synchronization mechanism makes sure services.exe is not executed twice, which is perfect for our use case as we don’t want to mess with the Service Control Manager (services.exe is the image file used by the SCM).

Now, in order to get a first glimpse at the DLLs that are loaded by services.exe, we can use Process Monitor with a few filters.

From this output, we know that services.exe loads three DLLs (which are not Known DLLs) but this information, on its own, is not sufficient. We need to also find which functions are imported. So, we need to take a look at the PE’s import table.

Here, we can see that only one function is imported from dpapi.dll: CryptResetMachineCredentials. Therefore, this is the simplest DLL to hijack. We just have to remember that we will have to export this function, otherwise our crafted DLL will not be loaded.
But is it that simple? The short answer is “no”. After doing some testing on various installations of Windows, I realized that this behavior was not consistent. On some versions of Windows 10, dpapi.dll is not loaded at all, for some reason. In addition, the DLLs that are imported by services.exe on Windows 8.1 are completely different. In the end, I had to take all these differences into account in order to build a tool that works on all the recent versions of Windows (including the Server editions) but you get the overall idea.
DLL File Mapping
In the previous parts, we saw how we could trick the CSRSS service into creating an arbitrary symbolic link object in \KnownDlls but I intentionally omitted an essential part: the target path of the link.
A symbolic link can virtually point to any kind of object in the object manager but, in our case, we have to mimic the behavior of a library being loaded as a Known DLL. This means that the target must be a Section object, rather than the DLL file path for example.
As we saw earlier, “Known DLLs” are Section objects which are stored in the object directory \KnownDlls and this is also the first location in the DLL search order. So, if a program loads a DLL named FOO.dll and the Section object \KnownDlls\FOO.dll exists, then the loader will use this image rather than mapping the file again. In our case, we have to do this step manually. The term “manually” is a bit inappropriate though as we do not really have to map the file ourselves if we do this in the “legitimate way”.
A Section object can be created by invoking NtCreateSection. This native API function requires an AllocationAttributes argument, which is usually set to SEC_COMMIT or SEC_IMAGE. When SEC_IMAGE is set, we can specify that we want to map a previously opened file as an executable image file. Therefore, it will be properly and automatically mapped into memory. But this means that we have to embed a DLL, write it to the disk, open it with CreateFile to get a handle on the file and finally invoke NtCreateSection. For a Proof-of-Concept, this is fine, but I wanted to go the extra mile and find a more elegant solution.
Another approach would consist in doing everything in memory. Similarly to the famous Process Hollowing technique, we would have to create a Section object with enough memory space to store the content of our DLL’s image, then parse the NT headers to identify each section inside the PE and map them appropriately, which is what the loader does. This a rather tedious process and I did not want to go this far. Though, while doing my research, I stumbled upon a very interesting blog post about “DLL Hollowing” by @_ForrestOrr. In his Proof-of-Concept he made use of Transactional NTFS (a.k.a TxF) to replace the content of an existing DLL file with his own payload without really modifying it on disk. The only requirement is that you must have write permissions on the target file.
In our case, we assume that we have admin privileges, so this is perfect. We can open a DLL in the System directory as a transaction, replace its content with our payload DLL and finally use the opened handle in the NtCreateSection API function call with the flag SEC_IMAGE. But I did say that we still need to have write permissions on the target file, even though we don’t really modify the file itself. This is a problem because system files are owned by TrustedInstaller, aren’t they? Since we assume we have admin privileges, we could well elevate to TrustedInstaller but there is a simpler solution. It turns out some (DLL) files within C:\Windows\System32\ are actually owned by SYSTEM, so we just have to search this directory for a proper candidate. We should also make sure that its size is large enough so that we can replace its content with our own payload.
Exploiting as SYSTEM?
In the exploit part, I insisted on the fact that the DefineDosDevice API function must be called as any user other than SYSTEM, otherwise the whole “trick” would not work. But what if we are already SYSTEM and we don’t have an administrator account. We could create a temporary local administrator account, but this would be quite lame. A better thing to do is simply impersonate an existing user. For instance, we can impersonate LOCAL SERVICE or NETWORK SERVICE, as they both have their own DOS device directory.
Assuming we have “debug” and “impersonate” privileges, we can list the current processes, find one that runs as LOCAL SERVICE, duplicate the primary token and temporarily impersonate this user. It’s as simple as that.
No matter if we are executing the exploit as SYSTEM or as an administrator, in both cases, we will have to go back and forth between two identities without losing track of things.
Conclusion
In this post, we saw how a seemingly benign API function could be leveraged by an administrator to eventually inject arbitrary code into a PPL with the highest level using some very clever tricks. I implemented this technique in a new tool – PPLdump – in reference to ProcDump. Assuming you have administrator or SYSTEM privileges, it allows you to dump the memory of any PPL, including LSASS when LSA Protection is enabled.
This “vulnerability”, initially published in 2018, is still not patched. If you wonder why, you can check out the Windows Security Servicing Criteria section in the Microsoft Bug Bounty program. You will see that even a non-admin to PPL bypass is not a serviceable issue.

By implementing this technique in a standalone tool, I learned a lot about some Windows Internals which I did not really have the opportunity to tackle before. In return, I covered a lot of those aspects in this blog post. But this would have certainly not been possible if great security researchers such as James Forshaw (@tiraniddo) did not share their knowledge through their various publications. So, once again, I want to say a big thank you to him.
If you want to read the original publication or if you want to learn more about “DLL Hollowing“, you can check out the following resources.
- @tiraniddo – Windows Exploitation Tricks: Exploiting Arbitrary Object Directory Creation for Local Elevation of Privilege – link
- @_ForrestOrr – Masking Malicious Memory Artifacts – Part I: Phantom DLL Hollowing – link
